Showing posts with label Painting. Show all posts

February 4, 2018

A Guide to Basing - The Quindia Studios Way

Which means lazy! I've gotten a couple of questions recently about how I base my models and I thought I'd detailed this here before, but... well, I couldn't find it so here you go. This is an easy method that still gives good results.


I mainly use three materials, fine ballast from Woodland Scenics, coffee grounds (the same as the mid-level texture on my terrain boards), and static grass - usually from Games Workshop because that is what is always available locally. Of course there can be more details, but this is the basis for almost every model in my collection.


When making units, I try to keep in mind where the bases will join those of their comrades to get as seamless appearance as possible. I apply white glue directly to the base and spread it around with a damp brush. I use the base as a pallett initially. just getting a small amount on my brush and carefully applying glue around the feet of the models before thinning out the rest.

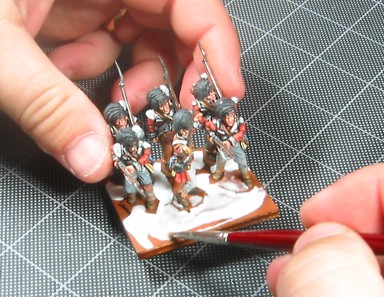

I have two tubs of basing material. The initial dunking is in the coffee grounds, and I just dip in a corner or two, or else pick up a pinch with my fingers to sprinkle a trail down the center. Then the lads are placed in the fine ballast and the extra shaken away. I use my finger to brush away any stray bits on the edges so I can line them up properly on the table.


I let this dry, normally over night, and then add paint directly on the texture, taking advantage of the natural color of the materials as my base. I use Wargames Foundry Base Sand A and use sort of a heavy dry brushing technique. Then I pick out out some of the larger chunks with Wargames Foundry Slate Gray A and highlight with Slate Gray B.


WHen the paint is dry, it's back to the glue. I only put one dot on the base of a single model and maybe two on a larger stand. A little goes a long way with this step and I want my earth to show through. I use a damp brush to randomly push the glue around and skip around to the base to make small tufts. Then they go into the third tub...


That's it! Sometimes I might add larger tufts of grass or stones, bits of fencing, discarded weapons, etc, but for the most part I try to keep things simple. I have more models to paint and I don't have time to hand paint mushrooms and the like. This style also matches my terrain boards well.


Hopefully this was helpful! I keep meaning to do more in the way of hobby articles rather than just 'look at the new thing I painted', but life has been stupid busy of late. In any case, the next time someone asks me about basing I will be able to find the article!

March 22, 2016

Tilting at Windmills

Whew! I just completed this fantastic windmill model from Tabletop World.  I think there are less details on a Napoleonic hussar!


Check out the ropes on the back of the vanes, securing the sails to the frame. Of course, this model will be the centerpiece in our Battle of Penny Burn Mill game for Historicon 2016, forming the anchor of the Jacobite defense.

The stonework was drybrushed in multiple layers and then I use several GW washes (Nuln Oil, Reikland Flesh, and Carroburg Crimson) to pick out individual stones to vary the tones. Then I used a final highlight of my palest grey to blend these back into the whole. I spent a very long time blending the smooth fabric of the sails and I'm not sure it shows in the photograph. You'll just have to come along and see it in Fredricksburg!

May 17, 2015

Boromite Overseer

So I settled on a color scheme...


I tried a couple of different schemes. I like the studio version, but decided I wanted to make my Guild unique. Rick Priestly goes out of his way to mention that in the future universe of Antares, gene splicing is a common practice, even for cosmetic purposes (giving you the license to paint your models any way you like). The Boromites in particular use technology to alter their natural appearances to mark themselves as a member of a particular Guild or family.

Here are the paints I used (all Wargames Foundry except where noted)...

Skin - Terracotta (37A-C), wash of GW Carroburg Crimson after A, final highlight of Native American Flesh Light (120C)
Rocky Scales - Granite (31A-C), wash of GW Nuln Oil after A
Eyes - Bright Green (25B and 25C)
Armour - Ochre (4A-C), wash of Casandora Yellow after A
Accents - Bright Green (25A-C) and British Red Coat (68A-C)
Metal - Slate Grey (32A-C) with spot highlights of White (33C)
Pouches - Storm Green (27A-C) and Conker Brown (54A-C)
Black - Black (34A and 34B)

This model was a lot of fun to paint, but it took me longer than usual. I think the main thing was simply a lack of familiarity with the subject. I had to repaint various areas more than once as I figured out what type of gear they might be. Hopefully, that will not be an obstacle going forward. The other thing is the model is full of detail and the details are TINY. I had to resort to smaller brushes than usual. Some of the third stage highlights are pin pricks!

Anyway, I like how this guy turned out and am looking forward to working my way through the rest of the starter army, beginning with the other two models and spotter drone of the Overseer Team...

September 1, 2013

Shades of Grey

I know my activity here has been very limited. Running the LoA blog has been quite a bit of fun but it's also been fairly time consuming. I am trying to finish Donnybrook, add to the range of Quindia Studios flags (almost have all of the Swedish foot for Poltava ready to go), and still piddling around with other projects.

One of these projects is a collection of adventurers for pulp era games, destined for an H.P. Lovecraft style setting. I'm not exactly sure what I'm going to do with them - I envision a skirmish game with several groups of adventurers (possibly rivals) and 1920's era policemen facing off against cultists, deep ones, and other Things That Should Not Be. My Donnybrook rules will work perfectly well with a few modern additions like vehicles and SMGs and some rules for madness and giant gribbly monsters.

Anyway, more on that at a later time. I decided pulp horror is best in black and white and so I set out to try my hand at a few noir minis...

Professor Kettlewell

Professor DysonMrs Sunderland
CurtisToby
I've got lots of these characters painted and I'll post some more in a few days. They have all been painted with various Foundry triads. The models are all from Artizan and Copplestone.

July 5, 2013

The Duke of Wurttemberg

Don't know if you've been following along over at the LoA blog, but I wanted to post pics here of the latest addition to my Williamite army here as well. The good Duke will lead my Danish brigade in games of Beneath the Lily Banners.


You can find step by step directions on how I painted this gentleman over on the LoA blog...

Things have been quite here, but I have had my hands full with organizing the other blog, adding new flags to the Quindia Studios range, writing and layouts for Donnybrook, and a few other side projects here and there (some of which will be featured here soon).

April 8, 2013

For the Greater Good

With the release of the new Warhammer 40k Tau Codex I felt inspired to try my hand at painting a few of the xenos and bought a box set of Fire Warriors. One thing I wanted to avoid was the need to painstakingly pick out every armored plate and edge highlight. I decided to give the Army Painter Quickshade another try. Most Tau armies seem to be painted in a pristine parade ground condition, but I wanted mine to battered from campaigning, so I felt like the Quickshade would be a... well, quick way of achieving this.

One of the problems I've had with Quickshade in the past is that though the results look pretty good, they don't look like mine. The contrast is simply not as pronounced as on my layered models. One way I decided to overcome this was to ensure I picked a color scheme with a high contrast. I like the various city camo schemes for Tau I've seen online, but I'm tired of painting grey (Red Scorpions and Death Korps of Krieg). I started by spraying the models with Army Painter's Skeleton Bone. The other colors were picked out with Games Workshop paints: the cloth with Rhinox Hide, the gun butts and various other bits and bobs with Mechanicus Standard Grey, the visor lights with Evil Sunz Scarlet, and the doohicky on the end of the pulse rifle with Gehenna's Gold. I picked out the leader's helmet and part of his shoulder pad in White Scar. Any mistakes were cleaned up with Ushabti Bone, which is a perfect match for the Skeleton Bone spray paint (almost as if Army Painter planned it). This took about an hour for the whole team.

Next I doused all of the models liberally in Army Painter Quickshade Soft Tone. I use a brush rather than dipping them in the tin. After all of the models were covered, I went back through them to make sure there were no puddles of standing varnish. This took all of fifteen minutes, but I left it to dry for 48 hours (the time was not wasted because I assembled and undercoated a second squad of identical composition over this period).

You will notice I repainted the team leader's helmet and shoulder pad with Evil Sunz Scarlet - the white didn't provide enough contrast to the rest of the armor after applying the Quickshade. The pic below shows the models after being coated in Army Painter Anti-Shine varnish. There have been mixed reviews on the net about this brand of matt varnish (a Google search will reveal these), but I've never had any trouble with it. It is absolutely vital to matt varnish the models after using Quickshade because the results are super shiny! I let this dry for most of the afternoon.

Finally I spent an hour or so adding Sept Markings with Evil Sunz Scarlet and battle damage in the same manner I described in my Ultramarines article a few weeks back. While underlighting the battle damage with Ushabti Bone, I also did minimal edge highlighting on the helmets and shoulder pads. Mud was added by drybrushing and stippling Mournfang Brown on the lower legs and lightly on random upper areas as well.

I'm wondering if I couldn't have achieved similar results with the Game Workshop washes and avoided the two-plus days of drying time. While it only took about two and a half hours to achieve these results, I could probably have done the same thing with the washes and finished the unit in a single day. Of course the Quickshade tin holds enough product to paint hundreds of models while the GW washes might manage twenty or thirty! This may call for another round of experimentation. I'm also wondering if I wouldn't rather have a a color scheme closer to the official GW studio version...

I don't know where this project is going. Certainly I want to paint up an HQ to give me a legal, if tiny, army. Two squads like the one above come in around 180 points. I should be able to easily fit in an HQ and another supporting unit of some sort for a five hundred point force.

September 2, 2012

Rainy Day Primer

Have I mentioned how much I loathe undercoating models with a brush? I can paint an infantry model, highlights and all, in the time it takes me to paint ten infantry models black. Spray paint takes a little experience to get good results and minimize touch ups, but once you master the process it is a huge time saver. I find myself with little enough time to paint these days and I try to spend that time finishing models!

That said, on Friday I received my first regiments of Warfare Miniatures horse in the mail (watch for a detailed review soon). I wasted no time assembling them, but it was RAINING thins morning. Never mind the impossibility of spray painting in the rain, high humidity often produces poor results as well, so even if it stopped soon I didn't want to spray these models. If I wanted to start painting I was going to have to undercoat a few by hand.

I decided to try one of Citadel's new 'Technical Paints' called Imperial Primer. I still haven't had much time to mess around with much of what I got in the Citadel Paint Bundle, so this was my first time using this. The paint is thinner than 'ordinary' Citadel paints, so there is no need to mix it with water to avoid obscuring the details. It also has a high concentration of pigment and adheres well to metal (unlike thinned down acrylics normally do). When it goes on, the paint looks a little streaky, but it dried to an even coat. The results were indistinguishable from a pair of models I had setting nearby that had been undercoated with Chaos Black spray paint - in fact maybe better as the models painted with spray paint appear satin while the those painted with Imperial Primer are matte.

Anyway, I'm off to paint some cavalry (photos and a review soon). If you undercoat models with black primer by hand, give the Citadel Imperial Primer a try.

April 11, 2012

Claymore Castings 2

As promised, I wanted to provide a review of Claymore Castings and I'm going to talk more about the new Citadel paints as well. The sculpts are by Paul Hicks and the models are quite simply some of the best I've ever placed on my painting table. There is a careful attention to detail, but the manner in which the sculpts are rendered make painting a joy - even the tiny laces on the leather jacks are easy to pick out with a brush. The soldiers are dynamically posed and carry various odds and ends of equipment that lend a lot of character to these models. 

I'm going to build a small collection for playing border skirmishes in the period so I mounted my models on wooded Litko bases (25mm round). The next step would be to clean up the model with a clipper and file to remove mold lines and flash... hmmm... ok, my Claymore Castings had ZERO clean up work. Wow - nice job (maybe Dave Imrie cleaned mine up before he sent 'em).

On to the painting. I never use a white undercoat. Ever. My style depends on using the black undercoat to provide the deepest layer of contrast and separate different areas of color to provide the ultimate contrast. Having said that, I am following along with Dave Imrie's painting tutorial so I decided to try his method of a white undercoat followed by a dark wash - Citadel Devlan Mud for Dave or Citadel Agrax Earthshade from my shiny new paint collection. This will provide a bright base for colors while hopefully providing the dark contrast the in deepest recesses that I want...


I'm not going into every stoke, but I want to say I am extremely pleased with the results and I am really happy with the new Citadel paints. In another departure from my normal method (and again following Dave's advice) I used a lot of washes. For the majority of colors I followed the following method:

1. Citadel Base Color
2. Citadel Shade (the wash)
3. Two layers of highlights from the Citadel... errr... Layers Colors

There are literally TWICE as many colors in the new range. One of the reasons I switched to Foundry paints years ago was to get a more subtle contrast between layers without the need to mix paints (yes - I am that lazy). Citadel has basically taken all of their old paints and added new shades between to create a range much closer to the Foundry model.

The end results of my initial test of the new line. While I am happy with these models, I still feel like I would rather start with a black undercoat. The new Base colors give even coverage even over black. On these models I actually went in and added a black line in a few areas. I've left the device off of the heraldry for the moment as I haven't decided exactly what to use for my fictional Scottish lord.


One thing about the Citadel paints that I'm not crazy about are the new texture paints. If you typically base your models with sand and then paint it you will probably love them, but for me the texture was too fine. I have my own basing method so I'll stick with that - maybe I'll find another use for the texture paints.

More Claymore models and another Warfare Miniatures unit coming up soon...

April 1, 2012

Citadel Paint Bundle


Yes - I'm nuts. Despite having hundreds of paints from Foundry, Games Workshop, and Vallejo, I just pre-ordered the mammoth new Games Workshop set. This monster comes with 145 paints and takes one of my three favored brands to a whole new level. I've been using the Foundation series quite a lot, as even the yellows and reds can be painted straight over black, maintaining a high degree of opacity even when thinned. They also make my favorite washes because they dry matte. There are now seven different types of paint - Base Paints, Shades, Dry Compounds, Layer Paints, Glazes, Textures and Technical paints...

Citadel Base Paints 
There are 34 Base Paints. Their high concentration of pigment makes them perfect for coating your miniatures, even over a black undercoat. These replace the Foundation Paints I mentioned above.

Citadel Shades 
Shades are for adding depth to your models, to create areas of darker color, define details, and accentuate recesses. These are the new range of washes, and again will dry matte.

Citadel Dry Compounds 
Drybrushing is one of the first painting techniques that many painters learn; it's an exceedingly handy way of picking out the details on a model, or applying highlights quickly and easily. There are 15 different shades. The Dry Compounds aren't like your traditional paints - they're, well... they're pretty dry. They look kind of lumpy, but the result should be a smoother drybrushing effect and easier to achieve to boot.

Citadel Layer Paints 
There are 70 Layer Paints. Everything from red and yellow to gold and silver are a part of the Layer range. To give you an idea of the scale of it all, there are 12 different greens, including everything from a vibrant turquoise to a putrid yellowy green. Essentially the Layer paints are the main colors of your model.

Citadel Glazes 
There are four Glazes in the new paint range - yellow, red, green and blue. Their role is to intensify color, to make an area of a miniature really stand out. On initial examination they look a lot like Shades, but they actually act very differently, and apply themselves evenly over a miniature, giving it a new hue. They are also perfect for restoring color to an area that you might have over-highlighted.

Citadel Texture Paints 
Unlike Layers and Base Paints they contain a mixture of paint and fine grit, which can be used to texture the bases of your miniatures. Even better, there are six different colors, so you can paint your bases to look sandy, dusty, snowy, muddy, or swampy straight out of the pot. I have my own basing techniques, but I'm looking forward to seeing what kind of weathering effects I can achieve with this.

Citadel Technical Paints 
Liquid Green Stuff (really cool stuff - if you haven't tried this I highly recommend it), gloss varnish, a clear matte medium for thinning the Layer Paints, and a black primer.

You can see more on all of these paints here:


I'll certainly have more details when the set comes out, but after reading about them I knew I had to have these new tools in my paint arsenal. No matter what you may think of Games Workshop rules, they have always made fantastic paints and the new range, with expanded colors and tricks, looks to be no exception.

December 16, 2011

Games Workshop Washes

I am experimenting with using Citadel washes from Games Workshop to unify the colors and add depth to my models. The concept works along the same lines as the Army Painter Quickshade dips with several differences. The Games Workshop washes have a high degree of transparency, but maintain a strong color even when watered down, which means I can simply apply the wash to the entire model AFTER I've finished all of my other painting. They dry flat and thus require a much lighter coat of varnish to seal. These washes are also water soluble so I don't need to keep turpentine around and I can use my normal brushes to apply it. Of course, the Citadel washes are much more costly than Army Painter since they come in a little bitty jar...

Here is one of the models I painted for the uniform guide in Beneath the Lily Banners.


The model on the left is finished in my normal painting style, simple layers, sans washes. In the photo on the right a simple wash of Gryphonne Sepia has been applied to the entire model, though I was careful not to let any areas 'puddle up' by removing the excess with a clean, dry brush (works like a sponge). The wash seems to add a richer tone and a generally smoother finish with the only sacrifice being an extra two minutes.

In the end, it may not even be necessary. Opinions would be appreciated...

May 13, 2011

Paints I Can't Do Without

I have been painting everything from fantasy to WW2 models in the last few weeks. Most of my painting is done in my lunch hour and I have a traveling paint kit that I carry to work. I have noticed that regardless of the subject, there are a handful of paints I always have in the kit (all are Foundry):

1. Flesh 5 A-C: Unless I'm painting orcs, this triad is always in my kit. Sometimes I use Terracotta 37A as a base to create extra shading before Flesh A.

2. Boneyard 9 A-C: This is a favorite alternative to white for tunics and breeches. I use this for lots of different leather items, drum heads, blond hair, etc. It's also great for bones, fangs, and claws on fantasy models!

3. Rawhide 11 A-C: I use this triad for boots, belts, hats, etc. There are lots of good earth tones in the Foundry line, but this seems to always be in my kit.

4. Spearshaft 13 A-C: I use this for boots and other leather, hats, hair, muskets, and, yes, spearshafts. I also frequently use it for horses.

5. Winestain 15 C: This jar of paint will last me forever - I use it to paint the bottom lip of all of models. This little touch of color adds a lot of life to the face.

6. Slate Grey 32 A-C: This one of my staple colors for neutrals, used for trousers, hats, pouches, etc. If I want a rough and tumble look for a model on campaign, I use A and B to add a five o'clock shadow to the jaw. I also use Slate Grey C as a base for white...

7. Arctic Grey 33 B: Like black, I rarely use more than one highlight for white areas. Maybe if I were painting a unit in parade dress or Imperial Storm Troopers I'd add a layer of pure white, but I don't normally carry it.

8. Charcoal Black 34 A and B: Unless a model is predominately black, I only use one highlight layer when I paint black.

9. Terracotta 37 A-C: Seems like I use a little bit of red on everything I paint! I tend to use muted tones in general... terracotta rather than red, ochre rather than yellow, etc.

10. Boltgun Metal: I have a full set of Games Workshop paints on hand, but this one is the only one that is a permanent part of my kit.

These are the foundation of everything I paint. Other colors may be dictated by a specific uniform or simply a whim, but I try to maintain a limited palette so I keep this to two or three extra colors when possible.

January 12, 2011

Dark Elves on Dinosaurs - Part Three

Done and Dusted! The goal at this stage is to keep the highlights small and sharp. On many areas, such as the scales, this turns into a 'dot' but if the scale is large enough I tried to paint a stripe along the upper third. Both metallics were highlighted with Citadel Mithril Silver and for the most part this was applied to the sharp edges of armor or only the highest peak of the helm.


I probably won't post any more on these until the unit is finished unless someone has specific questions on something I didn't explain. So now off to the other four!

January 11, 2011

Dark Elves on Dinosaurs - Part Two

Here is the second stage of my three-step (mostly - more on that later) painting style on a Dark Elf Knight...

The details are starting to take shape, especially the skin of the Cold One. The object is to highlight each area in such a manner that the original, darker color is still visible in the deepest recesses of the model. With the Foundry system, I often (but not always) simply grab the next color in the triad. For instance, in the blue base coat on the Cold One was Foundry Sky Blue Shade (21A). For my first highlight stage, I used Sky Blue (21B). In this instance, I concentrated on brightening the scales and painting on the different folds on the skin to bring out the texture.

All of the areas were treated in a similar fashion, though I used more of a blending technique on the robe because I wanted the texture to be smooth and contrast with all of the scales and armor this mini has going for it. Creating contrasts is not just about color choices! The effect is subtle, but will really pop when I add the third step.

I don't use a lot of washes in general, but I like the Games Workshop Citadel washes for armor and other metallic areas. The armor got a wash of Asurmen Blue (doesn't seem to show in the photo, but it did make a difference) and the gold areas with Ogryn Flesh. However, the metallics did not get a highlight as this stage. I prefer to add sharp, high contrast highlights on metal and I'll do those on the next step.

I'll post the finished model in a day or so and the whole unit in a few weeks. More Empire stuff is on the way as well as the 40mm ACW regiment I've been working on...

January 6, 2011

Dark Elves on Dinosaurs!

I have a few commissions lined up so far this year, and the first is a small unit for Warhammer Fantasy - Dark Elf Knights mounted on Cold Ones (the Dinosaurs I plugged in the title for those who are more grounded in reality). Being Games Workshop, these models are superbly sculpted and a fun diversion from my normal projects.

I thought I'd take the occasion for a little 'work in progress' series of posts and ramble on a bit about how I paint...

I use a black undercoat for all of my work and normally go for Citadel Chaos Black spray paint.It takes a bit of practice to get consistent results with any spray paint, but I HATE painting undercoats with a brush. If you're not used to using spray paint to undercoat your models, it's always best to apply two light coats rather than one heavy one to avoid obscuring the detail. The Citadel spray paint gives a very smooth finish and shrinks a bit as it dries which helps in 'avoiding obscuring the detail'.

Some artists work on one area at a time, finishing each location or color before moving on to the next. Rather than this focused approach, I paint the entire model with the darkest tone of each color I'm going to be using. I do this for a couple of reasons. First, this gives me an idea of what the finished model will look like. If I don't like a color combo at this stage, I probably wont like it when it's finished! Second, if I accidentally throw color where it doesn't belong, it's much easier to fix than it would be if I had carefully blended a neighboring color. Finally, I normally work on three to five models at a time and it is much quicker to use the same color on the group than painting models individually. The main thing I am trying to accomplish with this stage is clean, neat blocks of color with thin black lines (the undercoat) separating the different materials (the harness from the monster, for instance).

I typically employ the Foundry three stage paints (Unless noted below, all colors in these posts are Foundry), but I sometimes use Citadel and Vallejo as well. In this instance, I drybrushed the Cold One with Charcoal Black (34B). I drybrushed all of the armor and other metal bits with Citadel Boltgun Metal. I painted the head and underbelly of the Cold One with Sky Blue Shade (21A) and then began to pick out individual scales with the same color, creating a pattern similar to that of a Blue Monitor Lizard. I used Black (34A) to pick out some of the scales in a similar fashion on the head to create a general transition between the head and neck. The monster's teeth spines, and claws were painted with Boneyard Shade (9A). The harness and saddle were painted with Bay Brown (42B).

Turning my attention to the rider, I already mentioned the armor. I picked out individual plates with Citadel Shining Gold. The chainmail the rider is wearing is trimmed in leather which I painted Spearshaft Shade (13A). The robe was painted with Royal Purple Shade (19A).

My next step is the middle tones which will start to bring this thing to life. For those who prefer less fantastic subjects, hang in there - my next commission is a 48-model TYW unit! I'm also three command models away from presenting my first finished 40mm ACW regiment.