December 28, 2020

A YouTube Channel for the League of Augsburg!


Barry Hilton has started his long promised commitment to video content. He has made a short introductory video to Mad for War which I have uploaded to YouTube on a League of Augsburg channel. My hope is that both Barry and I will use this channel to support Donnybrook, Beneath the Lily Banners, Republic to Empire, Victory Without Quarter and Mad for War

We have a few instructional videos to upload over the next few days. These provide a walk through the core mechanics of the rules for Mad for War and a couple of short example games.

It would be great if you would subscribe to the channel and support our continuing crusade to bring 17th century gaming to the wider wargaming community. Thanks in advance!

The link is here. Click and have a look!

Mad for War Trailer


Learning all the way but was fun to do.

December 25, 2020

Ph'nglui mglw'nafh Cthulhu R'lyeh wgah'nagl fhtagn!

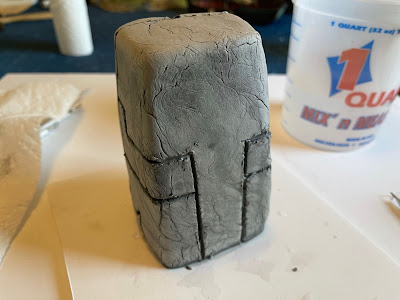
Not really miniature related, but something I made for my sister for Christmas. She and I are both fans of H. P. Lovecraft. I saw something like this offered commercially, though it was only 3.5” tall and didn’t come with a box. The photograph for the item DID display it, packed in moss and nestled in a beat up crate and that pic is what inspired me.


The idol is of great Cthulhu, variations of which are mentioned in The Call of Cthulhu. I sculpted the little monster out of DAS clay. I read a few tutorials because it's been decades since I've messed with the stuff. There was lots of advice on avoiding the surface cracking as it dries - I wanted this thing to look ancient, so I did the opposite of what they said to do!


After beating the lump into the rough shape I wanted, it was really just a matter of patiently gouging out some straight lines. It took a few to get the knack of producing these without leaving crumbling edges, but I soon had the hang of it and it went rather quickly after that.


After letting it partially dry (so the paint would soak into the material, not just lie on the surface), I used Citadel shades to add color...


I produced a letter from a 'colleague', explaining the reason for sending the strange thing to my sister and packed the whole into a box I purchased from a craft store (and subsequently battered and painted).


I'm really happy with how this project turned out! My girlfriend says she is really glad the spooky critter is going to someone else's house...

Right, back to more serious work soon...

Oh, Merry Christmas, everyone!


December 12, 2020

Donnybrook at Sea!


Avast! We are very excited to launch Donnybrook at Sea

Donnybrook at Sea has 58 pages packed with naval rules for Donnybrook, unit guides, ship type guides, a full example scenario and extensive period primers for exciting naval combat from 1640 to 1783 (and a bit farther in either direction... many of you use Donnybrook for periods beyond the ones it was designed for).


Donnybrook at Sea has an extensive ship type reference section


The supplement is available in pdf only for now. It is important you have Donnybrook to play with the naval rules because many of the core mechanisms are applied for figure activation and combat.


To help you choose your units there are pages of examples


We are offering Donnybrook at Sea for $13.25 and if you don't already have Donnybrook you can pick up both pdfs at a special price of $22.50.


There is an exciting and challenging scenario set in Brazil between two naval powerhouse nations


You can get it in the shops here:

Donnybrook at Sea (League of Augusburg Shop)
Donnybrook at Sea (Warfare Miniatures USA)


August 16, 2020

Danish Grenadier Corps, 1710

It's been a while since I've painted any Warfare Miniatures. I've been wanting to wander into the tricorn era of the period for some time, but there's always been 'just one more' project in the queue. Well, I finally decided to make a start of it!

While the Russians or Swedes are the obvious choice, the Danish army has always been a favorite of mine. My usual process when starting a new project is to pick a specific battle and then choose a brigade on which to focus my collection. Units beyond the core brigade will be chosen from those that fought nearby. While I usually have no plans to recreate a specific battle on the table top, this method allows me to point to an historical precedence for my little army.

Elements of the Danish army fought all over Europe, so I was spoiled for choices. In the end I picked the Battle of Helsingborg. Against the backdrop of the Great Northern War, King Frederick declared war on Sweden and launched an invasion to retake their lost province of Scania (in Swedish hands since 1658). The Danes raised an invasion force of 15,000 infantry supported by 4,000 cavalrymen and 30 cannon. In early November 1709, they landed in the province (southern Sweden) and were initially met with little resistance. The Swedes were hastily raising an army to replace their devastating losses at the Battle of Poltava the year before and it took three months for them to assemble a force capable of confronting the invaders. There is an extensive series of articles on the Battle of Helsingborg at the League of Augsburg blog, so I won't rehash that here beyond mentioning that is was a loss for my chosen faction.

The armies of both sides are well documented at Tacitus.nu and I supplemented this with more detailed information on the Danes from an article by Torstein Snorranson (translated by Dan Schorr), Danish Uniforms 1699-1712. The Danish army underwent a lot of changes, even in this short span of time. As usual with this period, sources sometimes offer conflicting information. Any mistakes in the historical accuracy of my wee soldiers is purely mine.

My initial goal is for a small army - four or five battalions of Foot, an equal number of Horse and dragoons, and a couple of guns. For my model force, I've chosen units from General Major Sichstedt’s Brigade, the central anchor of the first Danish line:

Livgarden til Fods
Dronningen's
Fynske
Jyske
Grenadier Corps

The megalomaniac in me really wants to do these units in the 'Grand Manner' - 40 figures each - but in the interest of actually getting a force on the table, I'll stick to the conventions of Beneath the Lily Banners for now and plan on units of 18 figures based on three stands. These are much more practical for my usual 4x6' game table anyway, but I'm making careful notes on the paints used so I may one day revisit this fantasy.

It's ironic that my first foray into the tricorn period was a unit... err... not wearing tricorns. The Grenadier Corps was formed in 1701, drawn from the grenadier companies of the established Danish regiments.


Of course, these are 28mm Warfare Miniatures (two packs of DN02, one DN03, and the mounted officer is from WLOA54a) and the flags are my own (also available from Warfare Miniatures). I've always liked the look of having a mounted officer in the center of the unit and decided to go this route with all of my Danish battalions.


This battalion depicts the unit as it may have looked in 1710 on the foggy coast of Sweden. Some sources list these lads as having silver (white) trim on their cuffs and crossbelt, but I've chosen to leave this detail off (I've also seen the crossbelt in buff, white, and yellow). I think freehanding the F4 monogram on all of their caps was enough frippery for one unit.

Right! So that's a start. I think Dronningen's is up next. I may consider fielding the Garden til Fods in their floppy hats and simply swap out the flags on my existing unit for this project (it is a myth that all units suddenly had tricorns after 1699, but I'll explore that more in another post if I decide to go that route).

July 17, 2020

Captain Rippington and the Canyon of Doom - Part Two

This took a little longer than I planned. I had some publishing duties on top of my normal day job, but here's the exciting conclusion to my game of The Sword and the Flame!


Whew! The game really came down to the last turn. I'll have one final post on this game with some thoughts on TSATF.

July 4, 2020

Captain Rippington and the Canyon of Doom, Part One

I finally had the chance to throw a few dice for my project with The Sword and the Flame!


These comic book style battle reports take quite a long time to make, but I'll have part two later this week!

June 14, 2020

Camels and a Horsie!

It's a great feeling to meet a hobby goal. This unit and the edition of a mounted Emir, completes my initial target to face off against my Highlanders.


Not a great photo, but I'll set up some proper shots on terrain when I get in my first game.

So for a quick recap, this gives me four units of Beja foot (two with spears, one with swords, and one with rifles), the camels, and a mounted Emir - 89 models in a relatively short period of time. Going forward I intend to add two units of Nile Arabs and a unit of Baggara cavalry. Beyond that? Well, we'll see. I may incorporate ahistorical things like Zanzibar slavers (I don't think they ranged up the Nile to Egypt), nefarious Belgian mercenaries (not really appropriate as allies of the Mahdi), or Central African style brigands (Rugga Rugga). I already have a large collection of these from the Wargames Foundry Darkest Africa range that will fit right in with a little rebasing. Of course, I can always add more Beja foot!

Up next - reinforcements for the Brits - a platoon of the IX Sudanese!

May 30, 2020

76 Models in Two Weeks!

That's it! Four units of Beja infantry (two with spears, one with swords, and one with rifles) for my Mahdist army!


And a few trees (I'm up to around a dozen - I've been fitting these into spare moments between units). Just twelve camel riders and a mounted Emir (got a head start on these today, though sadly I don't think I'll have much time tomorrow to make further progress over the weekend) and I'll be ready to march on the infidels!


I'm working on a small, straight forward scenario now, a reconnaissance in force by a British company to investigate reports of massing enemy troops in a nameless village east of Ginnis that could threaten the southern rail line. It will (hopefully) be the first shots in a mini-campaign!

May 25, 2020

Wounded Cameron Highlanders

I wandered off into rules in the last post, specifically about the casualty mechanics in The Sword and the Flame. Hits can kill figures outright or simply wound. A wounded figure cannot move on their own and must be carried by a comrade. The British suffer some pretty hefty morale penalties if they leave their wounded behind. The default mechanic in TSATF is tip lay the model on it's side to indicated the wounded. I'm not a fan of this as I think the bases sticking up in the air really detracts from the appearance of game.


The obvious solution was casualty markers. I'll remove wounded figures in the same manner as the killed, but use the marker to track the difference. Since I also didn't want to paint dozens of deaders, I decided to paint one for each unit and use a small d6 to track the number of wounded. In the event a unit is ever dragging around more than 6 wounded, I'm guessing they will probably be full on retreat. If not, I'll just drop another d6 next to the marker.

Simple, right?

Well, it would have been had I not decided to collect the Devils in Skirts. Perry miniatures doesn't make any wounded Highlanders for the Sudan. Neither does any one else I could find. That meant I would have to make them myself.

Using the Perry wounded in sensible trousers to do the heavy lifting, I set to with saw, file, and green stuff...


The model at the top has lower legs from a plastic Victrix Napoleonic Highlander and I sculpted the upper legs to give me a base for the kilt to drape over. For the one on the bottom, I filed the legs to remove the folds in the trousers and add the top of the stockings with putty. The kilts and sporran were added last. I lack the skill to mimic the tight folds of the rear of the kilt, but I'm happy with the end results.


Ok, back to the Beja!

May 23, 2020

A Tiny Horde

The first two units of Beja are finished for my Mahdist army!


I'm a little disappointed that I only finished two, but it took me a few evenings to build the others (another unit of spears, a unit of rifles, and camels) and I found I was out of Wraithbone primer. Being the apocalypse and all, my FLGS didn't have any so I was forced to turn to Amazon and lost out on two or three days of painting. Happily, the cans arrived this morning and I should have two more units by next weekend.


These really need some decoration on their robes scattered through at least some of the models, but I'll continue to press on for now. They still look pretty cool in a mob!

I still have enough plastic (beyond the units listed above) to build two more units of spearmen and I think I'm going to build them as Kordofani (Nile Arab) warriors, so they'll have little hats and turbans as opposed to the magnificent afros of the Beja and a different skin tone (on which I am still undecided). I'm going to mix in a few more robe colors on those as well to break up the wave of white and cream. I've seen paintings with brown, grey, and even pale blue.

Since I haven't been able to paint as much this week, I've been musing over rules. The project has been designed for The Sword and the Flame, but there are a few things I'm not overly keen on.

The first of these is the close combat system. It seems clunky and the opinion is shared by many around the web (and there are many fans of TSATF that thinks it works just fine). I'm going to withhold judgement on this until I actually get in a few games, but I would prefer to see mechanics that more closely resemble shooting. It's probably an easy fix if I decide to fiddle with it, but the game has stood the test of time so I'll try it as written to begin with.

The second thing that bugs me a little are tracking the wounded. The British need to carry theirs with them when they move and the natives become something akin to landmines in that they can attack an enemy who wanders too close. Again, this feature has opinions split. I LIKE the idea and the character this brings to the battlefield, but I'm not a fan of tipping my models over on their sides and leaving them littering the battlefield.

My initial plan is to make a casualty marker for each British unit - a wounded model with space to set a d6 to track the number of wounded. I think if the number ever goes over 6 wounded (killed models are removed and wounded may be killed as well) the unit is probably in dire trouble and in retreat. The first damn impediment to this plan is that the Perry's didn't make an Highlander casualties meaning I will have to convert them (grumble, grumble). We'll see how my sculpting skills are coming. There are no wounded Egyptians or Sudanese either, but I can probably carve up a command model to make one.

For the natives, I'll make casualty markers as well, but they will only drop half or a third as many (I'll work this out when I get to play some games) landmines as the standard rules. I may just do away with wounded natives all together.

There are tons of rule sets available for the period and I have many of them - Black Powder, The Men Who Would Be King, A Good Dusting, Up the Nile, Donnybrook... all have points to recommend and all are lacking something I want when I read through them. One of the great things of having chosen TSATF to model my armies is that ALL of these sets are playable, more or less, with the collection I'm amassing.

Ah, well - first world problems... More Mahdists soon!

May 18, 2020

From Now On, ALL of My Armies Will Contain Mahdists

Wow! It literally only took three hours to paint twenty-two models. I honestly think it took longer to build these (plastic Perry Miniatures) than it did to paint them!


Now, these guys could have more detail, such as decorative trim on the robes and I'll get around to adding the colored patches to some of the jibba, but I'm happy with how these look for now. I may add shields to some of the models later, but I've read that they didn't often carry them into battle and it was one less thing to paint.

All of the paints are Games Workshop. Steps listed below as 'Contrast' are a single coat of GW Contrast paint. If you've not tried it, the paint is like a base coat and shade in one step. It takes a little experimentation to get the technique down to apply as you can end up with 'patchy' results if you're not careful. The important bit is the order you do these in. Robes, then skin (Rhinox Hide), then hair. Each layer covers the last so you can quickly burn through these.

Primer
Wraithbone

Robes
Contrast: Skeleton Horde* OR Apothecary White*

Skin
Base Coat: Rhinox Hide
Highlight: Doombull Brown

Hair
Contrast: Black Templar*

Turban, Scabbards, and Arm Bands
Base Coat: Khorne Red
Shade: Agrax Earthshade
Layer: Wazdakka Red
Highlight: Wild Rider Red (Turban only)

Spearshafts and Rifle Stocks
Base Coat: Gorthor Brown
Shade: Agrax Earthshade
Highlight: Baneblade Brown

Steel
Base Coat: Iron Warriors
Shade: Agrax Earthshade

Gold
Base Coat: Liberator Gold
Shade: Reikland Fleshade

*GW Contrast paint

If you follow this method, here are a couple of things to note:

1. The robes will seem way too dark when you start out, but after applying the paint to the skin and hair, will brighten right up. I may add a few edge highlights in the future, but I did on my test model and the results weren't really worth the effort.

2. Doombull Brown looks very red when you first apply it, but darkens as it dries and makes a nice highlight.

3. The Baneblade Brown highlight on the spear shaft is a simple stripe down the upper edge. Don't faff about trying to paint the wood grain.

4. The necklaces, arm bands, and other equipment were given a coat of Black Templar when I painted the hair. When these were later picked in out in other colors, they give the 'black lining' effect I use on many of my models.

Whew!

For me 20+ models at a time is too many. Going forward, I'll work in batches of twelve. I'm using the 1, 2, 3 basing method I stole from Dalauppror to give myself the flexibility to remove single casualties, but cut down on having to move hordes of models individually. These look fantastic in the 'Mass Formation' from TSATF. I actually based them on their multiple stands before painting and it was easier to reach everything than I thought it might be. All of my Mahdists with rifles will end up on single bases so I can deploy them in 'Open Order Formation'.

It will take me a few days to put some more models together, but hopefully I can double the number of models above (and finish the bases) by the weekend!

More soon...

May 16, 2020

Cameron Highlanders - Second Platoon, A Company

Done and Dusted!


Second Platoon is led by Lieutenant Ponsonby Worthing and Sergeant McGruffing, turned out for inspection under the critical eye of Captain 'Fighting George' Rippington and Sergeant Major Archer.


I'm excited to get the company finished as it gives me the core for a British force I can actually use for small games and marks the end of painting tartans for a while. I'd really like to paint up the full battalion (four platoons in TSATF) present at Kosha, but I'll save that for the future. I really want to get stuck in with the Mahdists (there are around 100 lined up on the table for the next few weeks) and add some variety to my Imperials.


I'm really enjoying this project. More soon!

May 9, 2020

Cameron Highlanders, 2nd Platoon

Made small progress on the second platoon of my Cameron Highlanders...


Sergeant McGruffing directs the lads 'thataway'. I'm going to do my best to have the rest of the platoon finished by next weekend. Then I'm going to take a short break from the Imperials to paint up a few Mahdists so I can actual get in a game. By a few, I mean something in the realm of 100...

Once I manage to accomplish that (see the optimism?) I'll be switching between the two armies:

IX Sudanese Battalion (20 models)
Two more units of Mahdists (20 models or 12 models depending on if they are foot or mounted)
20th Hussars (12 models)
Two more units of Mahdists (possibly some Nile Arabs to add more variety to the army)
British Camel Corps (12 models mounted plus 10 troopers on foot and two bases of camels 'at ease')
Two more.. you get the idea.

My initial goal is five units of Imperials and something like 200 Mahdists. That's about the limit for a game of The Sword and the Flame (and my 4x6' table). If I actually make it this far, I'll see where the collection goes from there.

More soon...

May 3, 2020

Cameron Highlanders - First Platoon, A Company

I finished the first unit for my project set in the Sudan 1885. Although these are being organized for The Sword and the Flame set, they will work perfectly for Donnybrook as well!


Leader (Hero d12) Henry Hatwaver
Unit of 8 models (Regulars d8) Special Character: Sergeant Charger
Unit of 8 models (Regulars d8) Special Character: Piper McDonald

For those who don't know, the origin of Donnybrook was a one-page set I wrote for playing games with my Darkest Africa collection.


More soon.. starting on the second platoon this week!

April 23, 2020

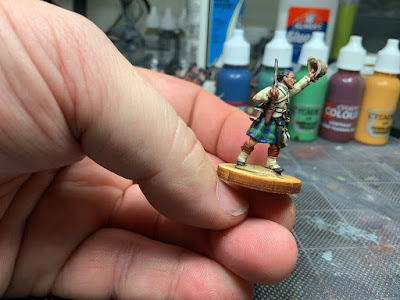
Painting All These F-ing Tartans

Captain George H. Rippington III
Here's the full list of paints I used for the Queen's Own Cameron Highlanders and bit of advice on the process. It's for my own benefit as well as everyone else's, so when I inevitably leave off for something else - hopefully not any time soon, but remember the AWI project - and return years later to add to the collection, I'll have some clue as to what I did!

All of the paints are from Games Workshop's Citadel range. A brief note on my shorthand. 'Base Coat' is exactly what it sounds like... a solid layer of color painted as neatly as I can. When this is the same as the 'Primer' color (Zhadri Dust in this case), the area was simply left as is which greatly speeds up the painting process. 'Shade' always utilizes the Citadel range of washes or 'shades' which is painted completely over the base coat. 'Layer' is a color painted on that almost completely covers the color below, leaving the darker tones in recesses. This paint is thinned with a tiny amount of water to add a bit of transparency for a softer transition. If there are two 'Layers' in a sequence, the second is painted only on the upper surfaces (the top of arms, the edge of sleeves, collars, and tunics, etc), again thinned with a tiny amount of water. 'Highlight' refers to edge highlighting where only sharp edges or pinpoint highlights are applied. Don't worry about some variation in tones between models - uniforms would be far less... err... uniform after a few months in the Sudan!

Primer
Zhandri Dust Spray Paint

Helmet, Jacket, and Gaiters
Base Coat: Zhandri Dust
Shade: Agrax Earthshade
Layer: Tallern Sand
Layer: Ushabti Bone
Highlight: Screaming Skull (Helmet Only)

Puggaree
Base Coat: Zhandri Dust
Shade: Agrax Earthshade
Layer: Ushabti Bone
Shade: Reikland Fleshade

Valise Kit, Tassels, and Rifle Sling
Base Coat: Administratum Grey
Shade: Agrax Earthshade
Layer: Pallid Wych Flesh

Sporran, Mess Tin Cover, Scabbard, and Boots
Base Coat: Corvus Black
Shade: Agrax Earthshade
Highlight: Dawnstone

Stockings and Sergeants' Stripes
Base Coat: Mephiston Red
Shade: Agrax Earthshade
Layer: Evil Sunz Scarlet
Stripes: Corvus Black

Musket Stock
Base Coat: Rhinox Hide
Shade: Agrax Earthshade
Highlight: Doombull Brown

Canteen Cover and Pistol Holster
Base Coat: Mournfang Brown
Shade: Agrax Earthshade
Layer: Mournfang Brown
Highlight: Deathclaw Brown

Canteen, Bayonet, Sword Blade, and Rifle Barrel
Base Coat: Iron Warrior
Shade: Agrax Earthshade
Highlight: Stormhost Silver (Bayonet Only)

Buttons, Buckles, Sword Hilt, and Rifle Butt Plate
Bace Coat: Liberator Gold
Shade Agrax Eartshade
Highlight: Liberator Gold

Ok... let's pause here for a moment. If you've read this far (what about the bloody tartan? I'm getting to it...) you've probably seen that ALL of these areas are shaded with Agrax Earthshade. To save yourself a huge amount of time, paint all of the base coats on these areas and then shade the entire model before moving on to anything else. After you've finished all of your layers and highlights, you can go back with Agrax Earthshade if necessary and fix any areas where belts may have strayed into one another, to bring out buttons, etc. This will give you a nice, dark edge around the flesh areas too...

Skin
Base Coat: Bugman's Glow
Shade: Reikland Fleshade
Layer: Cadian Fleshtone
Highlight: Kislev Flesh

Kilt
Ok, here we go.. first of all there is no shading or highlighting required. The pattern is busy and the fact that we've left off this stage won't be noticed and would be an even bigger mess than it already is. Having said this, painting the tartan isn't as difficult as it seems.

First, the diagram...


Don't worry about trying to work out how this falls into folds and such. I start by painting the bottom green stripe above the bottom edge and a parallel one midway between the first and the figure's belt. then paint the vertical stripes as evenly as possible all the way around.


No... Citadel hasn't started making paint in dropper bottles. I made these myself. I'll write a post on it at some point if anyone is interested in the how and why.

Base Coat: Kantor Blue
First Stripes: Waagh Flesh
Intersect Squares: Warboss Green (you can stop here for the Black Watch tartan!)
Red Stripes: Flesh Tearers Red
Yellow Stripes: Averland Sunset

The 'Intersect Squares' will likely end up more as dots than squares, but that's ok. The last two colors should be painted with the finest-tip brush you have. Flesh Tearers Red is a Citadel Contrast paint, which means it is somewhat translucent. This is perfect to mimic the stitching of the real thing. It's also thinner than 'normal' paint, which makes it perfect for painting fine lines. There should be TWO parallel red stripes for each one above, but at 28mm, they are lucky to get one. The yellow stripes seem to fall between every other red, so in the case of my models, there is only one about midway up. There would be vertical yellow stripes in the same manner, but I've chose to pretend they are all hidden in the creases! Since there isn't any shading, you can touch up errant strokes with Kantor Blue or Waagh Flesh as necessary, but you only need to correct egregious mistakes.

Stage by stage photos to better illustrate... looks a bit naff viewed at such size and I shudder to publish such pictures, but no sacrifice on my part is too great for you! The illusion works at normal scale - especially when they are seen from three feet away on the game table.


NOTE: The above figure was painted before I settled on my final khaki recipe so appears a little lighter than the finished versions (see the good captain at the start of the post). I wanted the jacket to be a shade darker to better contrast with the white belts and straps.

Finally, here are recipes for alternate colors you might see on British troops in the Sudan:

Alternate Red Coat
Base Coat: Mephiston Red
Shade: Agrax Earthshade
Layer: Mephiston Red
Highlight: Evil Sunz Scarlet

Alternate Grey Coat
Base Coat: Mechanicus Standard Grey
Shade: Agrax Earthshade
Layer: Mechanicus Standard Grey
Highlight: Dawnstone

Alternate Valise Kit (Bread Bag should still be 'white')
Base Coat: Zhandri Dust
Sade: Agrax Earthshade
Layer: Talleran Sand
Highlight: Ushabti Bone

I would only use the alternate valise kit color with the red or grey coat. Rifle units may still have black valise kits at this time and I would use the same formula as for the mess kit and boots above.

Right! Clear as mud? Hopefully this is useful to someone - at least it will help me later! If you have questions, please don't hesitate to ask.

More soon...