March 5, 2018

The Cock of the North, Part One


I had the opportunity to run a pre-release game of Beneath the Lily Banners/The War of Three Kings for some friends last weekend. They hadn't played any of the previous versions and were unfamiliar with the period, though eager to give it a try - and I was eager to see what they thought. When trying to decide on exactly what game to run, I turned to the pile of scenarios we have cashed away and found one that seemed fairly straight forward, but still offered some interesting tactical possibilities. I modified it slightly to match my collection.


The briefings were provided to each side, unseen by the others... Thomas 'I AM the Cock of the North' Grove would be Sir Arthur Rawdon...


Chris 'Bulldog' Lopez would take on the character of Lieutenant General Richard Hamilton, assisted by my long time pal and regular wargaming opponent 'Big Jim' McDaries playing Sir Neil O'Neill...


One side read their tactical briefing, including the sage tactical advice offered by the humble GM, and one did not... we'll see how they fared beginning in part two...

Left to right: Jim, Chris, and Tom

March 1, 2018

Limbers for Field Guns

Right, here's a proper limber this time - none of that dodgy strapping a gun to the back of the poor horse...


Obviously a field gun would be pulled by more than two horses, but in the same spirit that calls 18 men a battalion, I wanted to keep the footprint of the limber to a minimum for my usual 4x6' table. As before, the gun is not attached and was lifted from one of my field gun emplacements...


Of course, as one gentleman pointed out elsewhere, the gun should be made of all one material. I have a dozen guns painted for other periods and none of them are decorated as my 1690 collection. I'm not sure why I choose to pimp these guns, but I'll get around to repainting them one of these days...

I wanted to paint something on the small sign at the rear of the base, but haven't decided what - it's too low for a road sign, so maybe the Irish equivalent of 'Keep Out' or 'Posted' or 'Trespassers will be shot on sight'...

I'm traveling to the western part of Virginia to run a game for some friends this Saturday (Violence in the Valley 2.0) and I'll post the full scenario - The Cock of the North - and a battle report in the next few weeks. It might be a test run for starting my own League of Augsburg weekenders in the USA. I still need to paint more units before I can put on one of these spectacles, but I'm getting there...

February 20, 2018

Limbers for Light Guns

With everything else going on around here. I've got a pre-release BLB game planned for some friends in March and I'm scrambling to gather together stuff I need for the scenario. It's stuff I've wanted anyway (like the unit of All Pike painted earlier this month), but the desire to put on a good show is a great motivator to get the lead out!

The scenario has reserve units coming on the board and a couple of light guns are among the reinforcements. While I could just place the gun stands on the table modeling limbers is always preferable to me when moving guns is part of the game.


These were simple builds with a couple of parts from the bits box, a quick scratch-built fence, and a pikeman (sans pike) I painted for the uniform feature in BLB2...


I laid the plans for these models back when I painted my light guns originally. The guns are not glued to the artillery bases, saving me from needing to paint them twice!


Up next is a limber for a field gun which I need for the other side...

February 18, 2018

Beneath the Lily Banners/The War of Three Kings (PRE-ORDER)


Take the field and win the crown of England for your chosen liege Lord! Fight for King James and aided by your French allies, lead the Irish Army to victory against the usurper and his foreign horde. Support King William’s claim to the throne and captain an international army of English, Irish, Dutch, Danish and French Huguenot soldiers to wrest the crown from the hands of the tyrant!


The War of Three Kings offers the opportunity for games set between 1660-1721 to be played with simple yet elegant mechanisms which deliver a smooth playing experience, authentic period flavour and loads of fun.


The system covers pike and shot warfare in all western and central European theatres. This third edition of Beneath the Lily Banners (first released in 2009) has refined the game play allowing users to focus on enjoying the spectacle created by miniature gaming one of history’s most colourful periods!


Hard Cover; full colour; 184pp; by Barry Hilton with art by Clarence Harrison
Price: £30.00/$44.00 (Save money by pre-ordering... details below)

North America: Warfare Miniatures USA
The rest of the planet: League of Augsburg Shop

February 14, 2018

Irish Militia 1689

One of the new things in Beneath the Lily Banners: The War of Three Kings, is the ability to model different pike to shot ratios on the tabletop. I'm running a game for some friends early next month and I had everything I needed for the scenario except a unit of All Pike. It's been on my 'to do' list for a while to paint a brigade of non-uniformed troops to use for the early war in Ireland (and as militia for any part of the campaign), so I got a start on it last week...


Foot units of All Pike get a couple of hefty bonuses in close combat, but of course have no shooting ability. Something I'm a little unhappy with on this unit from a modeling perspective is despite having three pikes on the central stand, I didn't pay attention to the fact that all of them are holding their weapons in their outside hand (relative to their base). This blends them in with the wings and leaves a huge gap in the forest of pikes in the middle. I might actually end up prying those three off and rearranging them to fill in a bit.

I know, I know...

February 11, 2018

Trolls Come in All Shapes and Sizes

One of the most tedious things about working on rules is trying to weigh options against others. In my games, I tend to just throw models on the table, but in an effort to ensure others a decent shot at having two relatively balanced forces for a fair game relative strengths and weaknesses need to be compared to get a ball park for how many 'points' a model is worth.

In Donnybrook this was fairly simple. There are some Special Characters that have an edge over others if approaching as a power gamer, but the card mechanics tend to have a balancing factor of their own. If my unit of Recruits has their card come up three turns in a row while your Elite grenadiers are faffing about without a draw, the d6 models will end up being more powerful than the d10 ones for that game.

In Donnybrook Dark, balancing things is more difficult. How many zombies equal a detachment of Drilled Dragoons? How many trolls?

Right now, I'm leaning toward 1 point for two trolls and that means I needed another one. I painted Örjan a few months ago. This model is an 80's era Citadel troll and perfectly fit the aesthetic I wanted.


Digging around in the recesses of the mountains of lead tucked away around my house I found another antique model that fits well with the first one, even though in a totally different aspect. Meet Hugo, an old Ral Partha sculpt...


My concept of my milieu is that Fey creatures don't follow any norm and come in all shapes and sizes. This model was a little smaller than Örjan, but mounting him on the rocks gives him the illusion of a bit more bulk.

More soon...

February 4, 2018

A Guide to Basing - The Quindia Studios Way

Which means lazy! I've gotten a couple of questions recently about how I base my models and I thought I'd detailed this here before, but... well, I couldn't find it so here you go. This is an easy method that still gives good results.


I mainly use three materials, fine ballast from Woodland Scenics, coffee grounds (the same as the mid-level texture on my terrain boards), and static grass - usually from Games Workshop because that is what is always available locally. Of course there can be more details, but this is the basis for almost every model in my collection.


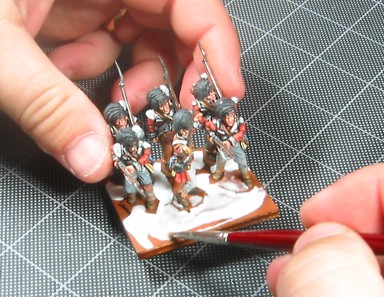
When making units, I try to keep in mind where the bases will join those of their comrades to get as seamless appearance as possible. I apply white glue directly to the base and spread it around with a damp brush. I use the base as a pallett initially. just getting a small amount on my brush and carefully applying glue around the feet of the models before thinning out the rest.


I have two tubs of basing material. The initial dunking is in the coffee grounds, and I just dip in a corner or two, or else pick up a pinch with my fingers to sprinkle a trail down the center. Then the lads are placed in the fine ballast and the extra shaken away. I use my finger to brush away any stray bits on the edges so I can line them up properly on the table.


I let this dry, normally over night, and then add paint directly on the texture, taking advantage of the natural color of the materials as my base. I use Wargames Foundry Base Sand A and use sort of a heavy dry brushing technique. Then I pick out out some of the larger chunks with Wargames Foundry Slate Gray A and highlight with Slate Gray B.


WHen the paint is dry, it's back to the glue. I only put one dot on the base of a single model and maybe two on a larger stand. A little goes a long way with this step and I want my earth to show through. I use a damp brush to randomly push the glue around and skip around to the base to make small tufts. Then they go into the third tub...


That's it! Sometimes I might add larger tufts of grass or stones, bits of fencing, discarded weapons, etc, but for the most part I try to keep things simple. I have more models to paint and I don't have time to hand paint mushrooms and the like. This style also matches my terrain boards well.


Hopefully this was helpful! I keep meaning to do more in the way of hobby articles rather than just 'look at the new thing I painted', but life has been stupid busy of late. In any case, the next time someone asks me about basing I will be able to find the article!

January 12, 2018

Warfare Miniatures Zombies


When I started working on my concept for Donnybrook Dark, something I knew I needed immediately were zombies. There are several manufacturers who make pirate zombies, but these didn't quite fit the bill as I wanted uniformed models. So I dug into my bits box and started a project worthy of Dr. Frankenstein.

The concept work began last spring on my home from Scotland. I got my first GNW models from the bins at Hilton HQ (it was like Christmas). I'd been wanting to paint some of these cracking sculpts for a while, but committing to marshalled ranks of troops was not in the cards, at least until I get some more units for my Ireland campaign done. Donnybrook was the perfect vehicle to get into the period.

We spent a lot of time talking about the Donnybrook Dark concept during my visit and I decided to use my new Swedes and Russians as the basis for black powder fantasy armies. As I said, I KNEW I had to have zombies and spent some time sketching out what these should look like.


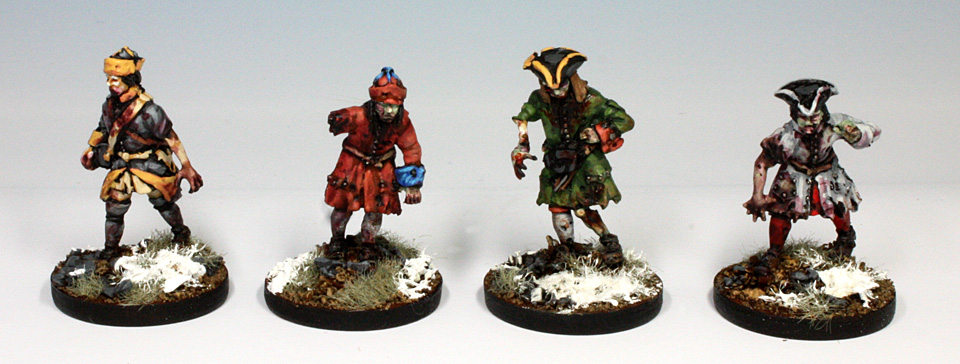
I did take a few work in progress shots, but sadly most of them weren't very helpful. The photo above shows my first four completed models.

Turning these lovely Warfare Miniatures into staggering zombies is really pretty simple. 

Think of the Pose
Zombies are lurching, lumbering monsters (at least the Romero type which are the only TRUE zombies). The noble bearing of most soldier models doesn't usually give that vibe. The easiest way to accomplish this is to remove one leg where it meets the coat, file away a small amount of metal at an angle, and glue it back in awkward position. It doesn't take much - trimming the leg away remove a mm or so of material already. The goal is to end up with a slight lean - too much and your mini is going to fall on it's face! If you are careful, you don't even need to remove the foot from the base. Several of the models above had their legs replaced entirely (see below), but it's necessary to get the effect.

Another thing you can do is get rid of that proud chin in the air by taking your clippers to the poor fellow's throat. You don't want to cut all the way through (though it's not the end of the world if you do). Again, the clippers remove a small bit of material and you can now bend the head down so in lolls on the chest or toward the shoulder. Just add a tiny dot of glue before doing so. If you behead the poor chap, you can still just glue it back on. Also choose a model with short hair, because this won't work well with long haired people like me - you'll need to break out the putty and sculpt the hair back to make it look right.

There are even a few models that look like they are stumbling around already when taken out of context of their tools - check out the Artillery Crew Running Back Guns...


Zombies are Hard on Clothes...
This part is easy. Grab your trusty clippers and chip up the bottom hem of the coat, edges of cuffs, and tricorn brims. Then use a pin vise to drill small holes in the coat and stockings. I cluster these around the torn hems first and then scatter some around the rest of the model. You can add larger slashes which look good on arms or shins with a scalpel.

...and Even Harder on Limbs
I used a sprue of plastic zombies from Warlord Games to quickly add dessicated limbs and the like. There are several manufacturers you could choose from, but Warlord fits in well with Warfare. Replacing an arm only requires a straight cut at the shoulder and possibly a bit of greenstuff. A hand is even easier and replacing well manicured digits with gnarled claws is great bit of detail. You can even remove an arm entirely for the easiest conversion of all. A few of the Warlord models have bare legs and feet and these were great for adding more variety. You can also use clippers to remove the lower jaw or of a model with an open mouth, a pin vise to remove an eye, or scalpel to add cuts to a cheek!


Zombies Don't Take Baths
The absolute easiest way to make models look like zombies is paint them to look like zombies! Paint the skin a bloodless bone or mottled grey and give them clouded white eyes if you paint such things (I skipped them on mine because I tend to leave eyes as shadow for historical models, but I think I'll go back and paint them for an extra bit of sinister). When you paint the clothes, take extra care to highlight the rips and holes you put all that hard work into making.

Add mud and mire. I just drybrush my base color on the lower third of the mini and add a swipe here and there farther up.

And, yes, add some gore. There are lots of ways to do this, but I used Games Workshop washes. The first is Carroburg Crimson and I stipple this around the mouth and down the front of the coat, on the hands to varying degrees, around obvious wounds I've created, and then splash some add random spots to break up anything that still looks clean. The next color is Agrax Earthshade and I apply this in the same places as the crimson, but concentrate it toward the center to represent darker areas of dried blood. Finally, I use a very small amount of black paint to deepen the gore around the chin and the tips of the fingers.


So, that's it and now all of you can mutilate Clib's wonderful models (or minis from any manufacturer really because this works for any period)! I really want to build a horde now of shambling undead. I have plans to make bareheaded zombies using some of the bits from the Warlord sprue, civilians, cossacks, and maybe some of those ready made pirates I mentioned earlier. Someone was on about zombie horses and I actually HAVE some so I might even mix in a few cavalrymen. 

Hope that helps! Now that my credibility as a historical gamer is destroyed (ok, I didn't have that much to begin with if you wander my other blogs with Space Marines), I'll let Barry show you some of the stuff he's been piling up in the closet...