
The material I use for this size texture is coarse ground coffee. I started using this years ago when someone at work was about to throw out a huge tin of Maxwell House that co-workers thought was too strong. I rescued it, thinking to use the tin for the basis to build a tower. I was about to embark on my first set of terrain boards at the time and realized the texture of the ground coffee would be perfect for mid-sized rubble! That was ten years ago... and I still have some of it left. I have since found that choosing a flavor of coffee that matches the period you intend to game in adds another level of realism to your boards...
Ok, I made that last part up, but you we're already thinking about what kind of coffee would go with your Tyranid terrain weren't you...
Anyway, I put down a small patch of glue, smear it around with a damp brush, and sprinkle on the coffee grounds.


At this point, the rubble areas will look heavier than they will end up. After letting the glue dry overnight, I vacuum the boards to remove any stray grounds before moving on to the next step. Remember the advice I gave you about the iron a few articles back? This goes doubly for the vacuum. Best not to even risk this when your significant other is home...


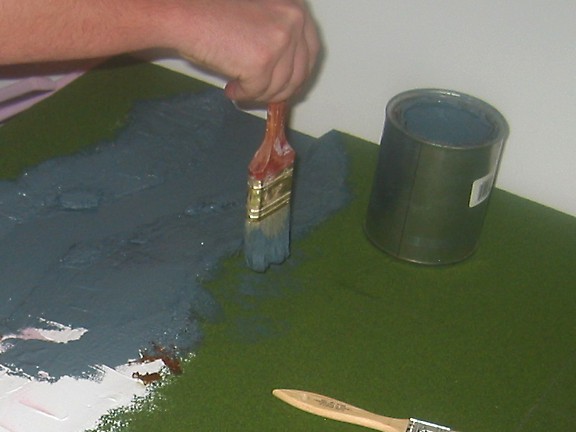
Next we are going to apply textured paint to all of the non-grass areas to form a base for the remaining painting we have to do. You can buy textured paint in lots of different styles. I bought an empty paint can from my local DIY superstore so I could mix this paint myself. There isn't an easy way to describe what the ratio should be. I poured paint into the can until it was about half full. The color doesn't really matter - any neutral shade will be fine. I used grey because I already had some textured paint left over from my urban boards. Anyway, start by adding a small amount of sand to your paint and then stir it with a paint paddle. Pull the paddle out and while holding it above the can (pointing down so the run off goes back into the can), use a brush to thin out the remaining paint on the paddle. If the texture on the paddle looks good to you, you're finished! If not add a little more sand, stir it in, and repeat the process. If the paint becomes gummy, you went too far. Don't panic! Just add more paint - that's why we started with half a can...

You want to use an old brush to apply this stuff because it's tough on the bristles! The goal os to completely cover all of the filler, coffee grounds, tree bark, and whatever else you glued into your landscape. Vary the direction of your brushstrokes - you will be able to see the patterns of the strokes because of the sand, but if you pull from different directions, you will get a good smooth coat.
EXCEPTION: If you have a river on the board, always brush the paint on in the direction the river flows. The brush strokes should be parallel with the river's course. This will enhance the look of the river when we get around to painting it, and make it texturally different than the rock/sand around it even though we used the same basic mixture for both.

In addition to just covering the filler, We also want to blend some of this paint out onto the grass board. I stipple the paint out to get patches. This will give a more gradual transition between the earth and grass, as will all of the rest of the painting we are about to do..

And so on... Next time we will start painting. I am going to break the painting up into several articles because I want to show as many WIP photos as possible. This is the most important step because a poor paint job can ruin all of this work!
Well, ok, that sounded scary - you can't really ruin it, but you might have to paint it twice! As usual, if anything here seems unclear, feel free to post a question in the comments. I will be happy to elaborate on a point or explain anything I might have left out!
Thanks for the tutorial. I have always felt that posts like this should be a wargaming 101.
ReplyDeleteThanks
Tony