
My short article on the desert boards left a lot to be desired as far as a comprehensive "how to" feature so I'm going to try and do this one properly. This is only the first of many installments that will chronicle this project and I will attempt to detail not only how I go about things, but why!
The first thing to touch on is why bother? After all, we've all played enjoyable games on humble grass mats or the even less ostentatious green felt. For me there are two answers. The first is I simply enjoy building terrain. It is just another aspect of a hobby that takes up an obscene amount of my free time. It's actually much more relaxing than painstakingly painting buttons on a regiment of 30 infantry! The second answer is related to my models. I spend a lot of time painting and basing my armies to a decent standard and I want the battlefield to be part of the showcase when I host a game - my local players can stop laughing - we will get some games in soon... why do you think I'm building the boards (edit: I still rarely get the time to play these damn games - sigh)?
Anyway, the first step deciding on the battlefield you want to build and then create a plan to fulfill your vision! I want some boards that will represent a typical European countryside for my ECW and Napoleonic games (as well as Warhammer, etc). Besides grassy meadows, I want a couple of boards that have water features and modeled hills on them. I've also decided to model roads onto my board which will make designing them tricky since I want to maximize the number of layouts.
After scribbling pages of sketches, I have decided on the following six boards:
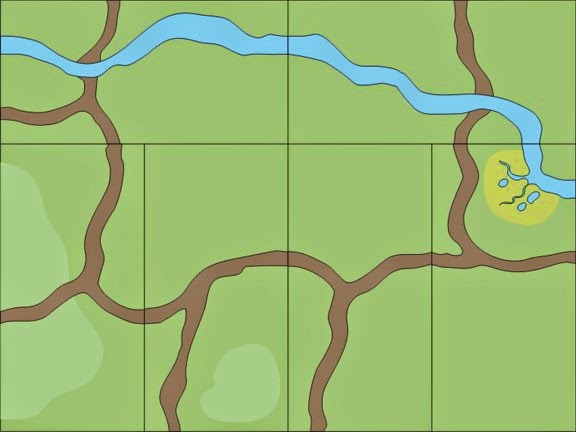
At first glance, this may seem restrictive because of the need for the roads and rivers to line up and the large hill on the bottom left board will always need to be on a table edge. This is where the scribbling paid off! Take a look at all of the possible combinations you can get by using three of these boards to make a 4x6' table!

To add further variety, rivers can either be classified as impassible and thus become the focus of the game as armies try to secure the bridges/fords to cross or they can be shallow streams that do little more than slow a unit down for a round as it crosses. Of course, I'll also be using loose terrain in conjunction with these boards so there will be forests, fields, villages, etc. Leaving some open areas on modular terrain is important to allow the inclusion of such features!
The next article will examine the process and materials I use to frame the boards and build the boring foundation for all of the creative work that follows.
I do so love it when someone does the brainy bit for you, thanks for the repost Clarence
ReplyDeletePerfect timing - I'm in the middle of a sectional terrain project!
ReplyDeleteThanks Clarrie! I think it was your original post on terrain boards that got me interested in your superb blog in the first place. Unfortunately I only made a half-assed attempt at following your excellent designs before so to quote Bullwinkle Moose: 'this time - fer sure!'
ReplyDeleteThanks, guys!
ReplyDeleteDoc, much of the information is the same in both (though the boards are obviously different), but this new series was actually my first. One of the points of documenting everything was so that I could replicate the process for future additions to my own collection!
Thanks for taking the time and effort to start reposting this series of terrain-board articles, Clarence! Speaking for myself, discovering them back in 2010 was made it possible for me to build my own set of boards, and I'm sure there are many others like me spread across the internet!
ReplyDeleteThanks Clarence. I also found the first posting of these articles really useful in planning my own terrain boards. It's now six years later, the boards are finished (all 20 of them) and they've had a lot of use at my local club and around the various shows for one-off participation games.
ReplyDeleteThe main success has been the fact that they do look nice when finished. I've also enjoyed, years later, adding bits to them or repainting, and adding the odd new board.
The main drawback has, without doubt, been their size and bulk for moving around. It also takes quite a lot of imagination to ensure that you have the best combination of boards and terrain when you first design them.
I think your suggestion about leaving enough space on the boards to then place free standing terrain is essential. It's a real temptation with terrain boards to sculpt everything realistically. But that means the boards are less flexible. So very wise words about leaving enough room.
Great post and thanks again for the inspiration!
Hi Clarence, just happened across these from Pinterest (who knew there were so many wargamers on there!) and this is exactly what I need! Can I ask what software you used to create the designs in the first place?
ReplyDeleteHi, Matt!
DeleteThe software I used for the pics above was CorelDraw, but that was more for presentation purposes. All of the original design work was done with pencil and paper! It helps to cut card into 2x4" strips and play around with the designs...
Hope that helps!
Thank you for this, Clarence. This provides a nice balance between modularity and realism. I know it has been some time since you posted this, but would it be possible to provide a grid version of your six boards or measurements for where the roads and rivers leave the boards?
ReplyDeleteThanks!
ReplyDeleteThe roads and rivers all leave the edges 4” from a corner on The two-foot sides or 4” from the centerline on the four-foot sides.
I’m actually gearing up to do a new set of tutorials sometime soon as I’ve changed a few things in construction and I’ll make sure to cover all of this again. My new designs include a mix of 2x2 boards and 2x4 boards (and possibly the occasional 4x4 for modeling long grade slopes and the like).
Stay tuned, but feel free to ask questions any time!
Hi, I am a user of your ideas and they really work and look nice. Waiting to see info/pics of the new ideas and boards. Cheers!
ReplyDelete