March 24, 2018

Wandering Around Ireland, Part V

A conversation I had via Messenger last week...

"Are you ever going to finish blogging about your Ireland trip?"

"What? Didn't I finish it? That was a year ago..."

"Didn't you go the Boyne?"

"Son of a..."

So, yes. Roughly one year ago I took a trip to Scotland to play some games with toy soldiers and then on a boy's adventure outing to Ireland (you can find the other installments here). Barry Hilton, Bob Talbot, and I trekked through the old city of Londonderry, explored Enniskillen, and climbed fences to walk the battlefield of Aughrim. On the last day of our trip, we did indeed go to the Boyne. We drove up from Mullingar after a Full Irish Breakfast (note... White Pudding is neither white, nor pudding) and were joined on our excursion this day by Paul Patrick...


The battlefield was the first one on the trip that resembled an American site, with a welcome center, cafe, and a small museum. However, besides a small field around Oldbridge, the land is still in use for farming and pastures and we would once again be climbing fences to get to access to different areas.

Very quickly, for those who stumble on this site unaware, the Battle of the Boyne took place in 1690 between the armies of King James II and King William III near the town of Drogheda in Ireland. For a brief introduction you can read the cliff notes here.


I had really been looking forward to this as the armies I am collecting are mostly based on those that fought around Oldbridge, Grove Island, and Yellow Island...


 We started at the museum, most of which didn't allow photography except in the yard...


That's Paul Patrick behind the wagon, which should look familiar to fans of Warfare Miniatures. Umm... the wagon should look familiar, not Paul...

Then we wandered down to the site where the hamlet Oldbridge once stood. It was the strong point for the Jacobite defense. Ironically, you can't actually see the Boyne from the site now because there is a thick stand of trees to the north, between it and the river. The open fields south of Oldbridge were the site of repeated Jacobite cavalry charges against the Williamite troops struggling across the river and now form the front lawn of the welcome center...


The last photo is a bit southwest of Oldbridge and is most likely the position held by the Jacobite reserves. All four photos show a sharp ridge and that was where we hiked next, heading away from the Boyne in the direction the retreating Jacobites would have travelled.


Beyond the ridge the land slopes away to the southeast and that highland on the horizon is Donore Hill, where the Jacobite dragoons and assorted other remnants set up a holding action that allowed the rest of the army to escape to Duleek. Just look at the photo for a few minutes and think about running to that hill. Now add a thousand sword wielding soldiers in pursuit mounted on monsters about the weight of a modern smart car. We were amazed any of King James' army survived. More on Donore and Duleek in a future installment...

What? Yes, soon... seriously...

We climbed down the ridge and headed back to the north. We crossed through a fence to a narrow road, and on to Obelisk Bridge - here I had my first real view of the Boyne River (on the bridge, facing west)...


We crossed the bridge and clambered down the steep shoulder to stand on the spot (or very close to it) where William's Dutch Guard launched their assault on Oldbridge.


Heh, I took about thirty photographs of the spot because I knew the cover of The War of Three Kings was going to feature the crossing. I drew the sketch on the plane ride across the ocean...


...and ended up with this...


I tried to get Barry and Bob to wade across so I could get references for the way the water would foam around the soldiers, but they were decidedly unhelpful. Oh, well...

More on the Boyne in a few days...


March 15, 2018

The Cock of the North, Part Four

Well, that was fun! Running a game for players who have no experience with a rule set is always tricky. You can spend a lot of time bogged down in tedious explanations of mechanics and the minutia of the charts and discover that no one remembers it all anyway, or you can just dive in. I explained that the troops mostly use d6s or d8s to resolve their actions (a concept they WERE all familiar with from Donnybrook), told them how fast they could move in line and column, told them the range of their muskets (and that mounted troops can't fire), and explained how to give their troops orders.


I didn't time the game, but I'd guess we played through thirteen turns in about three hours, including the initial explanations. Obviously I am very familiar with the rules, but this was first time running these for other people and with the exception of keeping the charts handy I had little need to refer to the rulebook. The turns were fast and seem to have a nice flow to the action. The simultaneous move system is NOT new, but something that struck me was the fact that players aren't standing around waiting for their turn. You reveal orders, BOTH move their troops, take turns resolving fire which is a quick process, and close combat has BOTH players rolling dice to determine the outcome - it keeps everyone involved at the table and contributes to the speed of play.


Of course, I ALWAYS forget a few things while the dice are flying, but that's EVERY game really, not just ones I helped make! Dragoons occasionally fought as Blade Horse rather than (duh) Dragoons (against each other so I guess it was a wash), a couple of Raw units failed to rout when they lost a round of combat (though this was on turns twelve and thirteen and would have made no difference to the outcome of the game - they WERE destroyed anyway), and I might have missed a couple of required morale tests. Nothing too egregious and I would have gotten away with it too had I not just spilled it here!


There were a few things that would probably have gone differently had the players been more experienced with the mechanics of the game or maybe even this period of history. Attacks were often carried out piecemeal as opportunities presented themselves. Several times units were stranded at point blank musket range in situations that might have been avoided. All in all though, it was still pretty well played. The outcome was still in doubt by turn ten, which is why they wanted to keep playing.


Thoughts from Thomas Grove...

I thought the rules were very smooth and fluid and easily grasped after a few turns. With the order percentage mechanics it made for a very tense and exciting game. We played thirteen turns, fighting to a clear conclusion, and were so engrossed in the action we totally forgot to break for lunch! From what I've read so far, and what Clarence has explained, I felt the game had a good period feel. The scenario was really fun. From the get go, I knew I had a challenge on my hands with the hastily raised militia force of Sir Arthur Rawdon. With cunning use of the DEFEND order to bolster their questionable abilities, and a bit of luck, I managed to come out on top. Cock of the North!

(oh, and thanks, Tom, for letting me use some of your photos from the day)


So that's it! Hopefully you enjoyed this series - we'll try to more in the future. I think this is the best iteration of the rules yet. We are really looking forward to finding out what other people think...

March 12, 2018

The Cock of the North, Part Three

Turns five through seven saw the action heat up as both sides began to make more aggressive moves.

Sir Arthur attempts to dazzle his opponent with a double order deployment in hopes of confusing his foe...


Unfazed, General Hamilton responds by trying to blind his opponent...


In the center of the field, Captain Magill's Dragoons crash into the second squadron of Tyrconnel's Horse. A furious combat ensues, but the balance is tipped by the reinforcement by the third squadron and the dashing presence of Colonel Sheldon. Magill's squadron bloodied their foe, but in the end were cut down to a man and their standard captured by Colonel Sheldon himself (or so he later claimed).


Major Baker and the Loughbrickland Country Companies watch the cavalry clash from the safety of Dromore, thinking 'yeah, it's better to be a foot soldier!'


Until the guns find their range! Only the shrill shouts and threats of hanging from the nearby Sir Arthur hold them in place.


On the Protestant right, O'Neill's Dragoons refused to charge the Hillsborough Country Companies lining the stone walls to their front. Fuming over the slight by the Cock of North and planning on the letter he would shortly pen to the Association, Lord Mount seized the opportunity and succeeded in whipping the Volunteer Horse into a charge against O'Neill's Dragoons who were certain to overcome their reluctance soon. Sir Neil, eager to cross blades with the enemy officer, surged forward against Lord Mount in single combat. The duel was epic as the pair were evenly matched, but fate (and the dice) left Lord Mount dead on the field, his letter of protest unwritten.

Exultant in victory, Sir Neil turned to discover either his troops had again refused to charge or did not hear his command, and were caught by the ridiculous ploughsmen at the halt! His Dragoons were withdrawing and he had to make haste to catch them, chagrined by their lack of martial prowess and the fact that no one apparently witnessed his...


Turns eight through ten saw Tyrconnel's squadron overrun a small battalion gun while it was still limbered, only to be forced to withdraw from fire as Baker's unloaded a First Fire volley at Point Blank range! Sir Arthur left the safety of Dromore to personally take command of his three squadrons of Dragoons who seem to have lingered in the wood on the left for most of the game. They were spurred into action by the advance of the Jacobite Foot in the center of the field.

At that moment, the Jacobite field gun again found it's range to Baker's Battalion and sent them into retreat without the morale bonuses afforded by their commander. Thomas asked if the unit in reserve could lower their pikes to stop them... I think he was only partially joking.


Technically at this point, the game would end on turn ten, with the Protestant Association still firmly in control of Dromore, but events in the center of the table were far from decisive and the players wanted to keep playing.

On turn eleven, Sir Arthur's Plodder level raised its head and he got NO orders. There was desultory exchange of musketry that saw one casualty suffered by Rawdon's first squadron.

However, on turn twelve, Rawdon's 1st squadron attempts to charge Bellew's Battalion and is WIPED OUT by a devastating point blank volley as they charge in. Rawdon's 3rd squadron charges Clancarty's with the opposite result, routing the Jacobite Foot and destroying them, capturing their colours in the process!


On turn thirteen Rawdon's 2nd squadron, hurdling the twisted corpses of their fallen brethren, rides down Bellew's Battalion and captures their colours. The consolidated remnants of Tyrconnel's 1st-3rd squadrons crashed into the disordered ranks of Rawdon's 3rd. Sir Arthur pushed through the ranks to reach General Hamilton. In the ensuing duel, the general was unhorsed and he struck his head in the fall, rendering him unconscious!


Rawdon's 3rd squadron of Dragoons were destroyed in the melee and their colours were lost, but Sir Arthur escaped, crowing 'I AM the Cock of the North' as he outpaced the pursuit!


At this point they players decided to call it. The Jacobite army had been reduced to a couple of very depleted squadrons and a field gun. With Hamilton unconscious, Colonel Sheldon ordered the gun limbered and the cavalry to fall back. The rest of the army would arrive soon and possibly then they would avenge this insult and wring the neck of the Cock of the North.

My final thoughts and some impressions from Thomas Grove on the game in the last installment of this series...

March 11, 2018

The War of Three Kings QRS

We opted out of printing a QRS this time, but fear not you can have them absolutely free! Once you get a handle on the game, most of the rules you'll need are right here...


OMG! IT'S SIX PAGES LONG!

We got that with Republic to Empire and it somehow translated into causing some people anxiety. Let me head this off at the pass and point out YOU DON'T NEED ALL OF THIS, but I play this game too and I know what I like to have on hand without the need to refer to the book.

The entire page of 'When to Take Morale Checks' (page five) was added to round out the count to an even number (and save you needing to grab the book). You'll rarely need to refer to move distances and terrain effects (page two) after a game or two, but again it's good to have at hand. Same goes for the Order Allowance Table, Musket Ranges, and definitions of Orders and 'Unit is...' from the Close Combat charts. The Commander Ability table, Risk to Officers, and Artillery Misfire table are rarely necessary.

For the most part, you need the Turn Sequence (page one), the Close Combat charts (page three), Shooting and Artillery (page four), and Morale (page six). You can bin the others if you like. YOU might not need page one, but I find that no matter how many times I play a game, I muddle the Turn Sequence with the other 99 sets of rules I have rattling around in my head (Where's the Magic Phase?).

Ahem... right... rant finished...

You can download these onto a tablet, print them double sided and laminate them, or print them singly and slip them back to back, maybe with a sheet of card in between, into plastic sleeves (like the ones made for binders). I put mine into a custom GM screen like the kind those nerdy RPG folks use (cos playing with toy soldiers is way cooler)... pretty much heavy card sheathed in vinyl with clear pockets on each side...


Not sure where I got this, because I've had it for years for one of those nerdy RPGs, but there's a good selection online. My screen is a tri-fold, but the four-fold screens would let you add a couple of sheets with notes on your scenario, special rules, etc.  After the fact I'm thinking I'd like to have references for Fighting in Built Up Areas which I left out initially - maybe I'll get around to making up some sheets for a fourth panel (OMG! It's EIGHT PAGES LONG!). These days 'landscape' format is more popular with RPGers, but that would work just as well since we're not actually setting these things on the table to hide our dice rolls... usually...

Let me know if I can improve these in some way - the best thing about not having 1000 of these printed is that I can go back and update the files!

March 8, 2018

The Cock of the North, Part Two

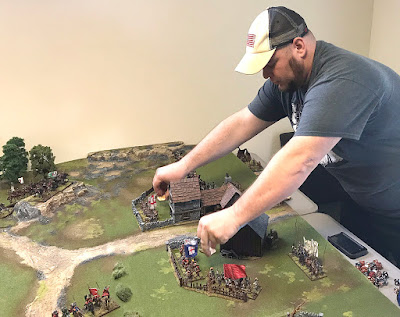
For the initial deployment, I placed the Foot of the Protestant Association in the village of Dromore, and left it up to the players to deploy their Horse and Dragoons as they saw fit. With Hamilton not yet on the field, Chris played Colonel Dominic Sheldon who had command of Tyrconnel's three squadrons of Horse, with Jim in command of Sir Neil O'Neill's two squadrons of Dragoons. As this was a game for new players, I decided not to introduce the ability for the Dragoons to dismount and used them as purely mounted troops. I also didn't use the rules for Fighting in Built Up Areas and treated the village as the collection of walls and impassable buildings.


When rolling for Commander Ability, Chris generated 'Competent' for Hamilton and Tom rolled 'Plodder' for Rawdon...

'What's a Plodder, then?'
'A buffoon, probably surrounded by sycophants and yes men of equal incompetence...'
'Ah! Ok, I can do this!'


Wasting little time, Sheldon attached himself to the head of Tyronnel's Horse and ordered them to ride down the scum who refused to bend the knee to good King James!


Sir Neil O'Neill, wily soldier that he was, decided to wait a bit and see how Sheldon fared before joining in the fray (to be fair, owing to poor dice rolls on the Command Allowance chart, but it DID happen three turns in a row...)


'Right! I'm documenting your tardiness for Hamilton (and for the blogs)!'


Thomas managed a round of shooting with a First Fire Volley that weakened the first squadron before it's charge and managed a draw on the initial clash of swords and bayonets. Horse are much weaker in successive bounds if their charge fails to break their opponent and despite the second squadron piling in for support, Tyrconnel's Horse were forced to withdraw from the fight to a rousing 'HUZAAH!' from the Protestants.


Turns three and four saw little action as Tyrconnel's reformed and O'Neil decided to take his men to the creast of the hill for a peek, just in time for the arrival of Hamilton...

'Here now, what are you lot doing lagging about, Sheldon? Why is O'Neil advancing alone on the enemy?'


Volunteer Horse, farmers poorly equipped with kit from the last war, arrive to bolster the Protestat right flank, though doubtless a poor comfort to the troops already in position.


Lord Mount arrives with the reinforcements to take command. I let Thomas roll for Command Ability again, with the intention of allowing him to shift control to Lord Mount if the result was better - it wasn't... another Plodder, possibly drunk as well if the rumors were true. Thomas said Rawdon had no intention of relinquishing control, even if the newly arrived leader proved better...

'Well done, Sir Arthur, I'll take it from here...'
'Sod off - I'm the Cock of the North! You can go lead those nags you brought with you!'


Already composing a stern letter of protest in his head, Lord Mount deploys on the right flank...

'This way! NO! The battle is THIS way!'


Reinforcements arrive for the Jacobites as well...

'Ummm... that gun's bigger than mine... things just got real!'


Join us for the exciting conclusion in the next installment!