Showing posts with label Modular Terrain Boards. Show all posts

April 16, 2018

The Walls of Limerick, Part II

A little bit of math, lots of carving, and possibly some harsh words later...

The initial step, and the most important to get right, was to layout the front wall. This is where most of the harsh words came in. All of the angles had to meet up with each other and line up with the edges of the boards.


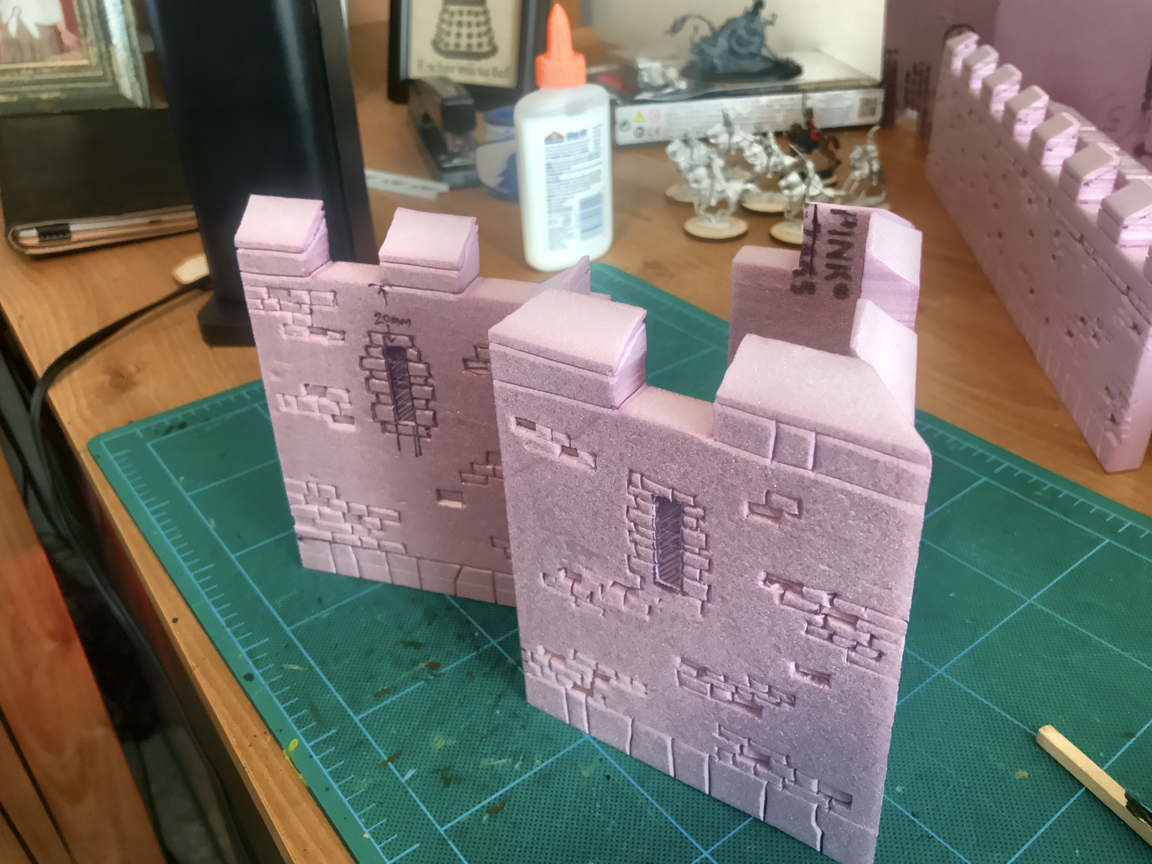
The walls were detailed by carving scattered stones with a scalple and then going over all of the cuts with a ball point pen. The pen makes a nice bevel on the edges of the stones and ensures the detail won't be filled in by the layers of paint coming up. Cutting the stones in initially with a blade means you can use a piece of balsa wood to press some of the stones into the surface which adds a cool bit of detail with very little extra effort. I'm going to add a few stones cut from slivers of foam that will stand out from the wall as well, adding yet another layer.


The windows were pressed down in the same manner as I just described. When painted it will add to the illusion of depth.


Very pleased how well all of the parts actually fit together...


So here's where I am after the weekend. The angled wall with the walkway will be attached to one board and the citadel and it's adjoining wall be attached to the other. The central wall with the gate will remain loose so it can be replaced with a section of rubble. No, this wasn't deja vu - I explained this in the first post, but I thought it made more sense now that there are photos!


Next up are the details.. gates, doors, trapdoors, stairs... stay tuned!

Oh! And thanks to everyone who reached out to send me photos from Limerick - your contributions are much appreciated!

April 13, 2018

The Walls of Limerick, Part I

Every so often I get the urge to launch some sort of stupid large project. Ever since my partner's series on the Walls of Derry, I've wanted to do something similar. My trip to Derry last year reinforced the desire. Finally, I'm planning to run some games at a small local show if my schedule works out - The Guns of August in Newport News, Virginia. Rather than just set up something from my existing collection, I decided to build a new table and go all out.

Sorting through the mound of books I've collected on the campaign of Ireland, my first inclination was to do something around Derry again. However, then I stumbled on the first siege of Limerick. Gamers often ignore sieges thinking them to be dull., static affairs of battering walls with cannons, but both Derry and Limerick feature several small actions in the form of sallies that make perfect tabletop games.

On August 20, 1690, the besieging Williamite army launched an assault from their siege trenches to capture Yellow Fort, a small, open-backed redoubt outside St John's Gate. It took several attempts, but they were successful. The Jacobites responded in force with a sally by four battalions of foot and three squadrons of horse, countered in turn by more infantry and cavalry from the Williamites, including one of my favorite unit - the Danish Foot Guard.

To bridge the gap between the small forces involved in the initial assault and the battalions that later took the field, I've also decided to reduce the man to model ratio which will give me foot battalions of five to seven stands rather than the standard three. This will allow me to represent the detachments with a significant number of models rather than the 4-5 each would muster at the default scale.

I'll go into more detail about the scenario and forces involved in a later post, but for now I just want to introduce the project.


The walls of Limerick were between 25 and 30 feet high with a narrow walkway on the top. A ditch was excavated outside the stone wall and the spoil used to build a counterscarp, covered way, and glacis. The tiny section of wall I'm building is St John's Gate, seen above on the left end of Irish Town. The old citadel near St John's Gate was pulled down and replaced with a new bastion and an earthen demilune constructed outside. My first step for any project like this is sketches which I then take to the computer to make a scale diagram. This was extremely important for this project because there are very few right angles and it was going to be a pain to make sure everything lines up properly.


I spent a lot of time messing around with scales and angles to decide exactly how to lay this out. There were a few things to take into account...

1. I wanted to avoid a 'square' table. By this I mean 95% of games you usually see... side A is lined up on this table edge and Side B is on the other. The historical design actually helps this as the wall runs away from the gate at an angle. The battalions will actually end up facing down each other diagonally across the board.

2. I wanted the fortress to be permanently attached to the boards, but I wanted to keep things flexible so I can use these for other scenarios. What I decided was to use 2x2' boards. The bastion would be attached to one and the wall to the other, with the gate section remaining loose and 'bridging' the boards. This will allow me to replace that piece with a breach to play another style of game. Not sure if that makes sense, but it will be illustrated as the project progresses.

3. I wanted the counterscarp (and the siege trenches - more on that later) modeled as a permanent part of the boards, but decided to build the demiline as a separate model so I can use it as a redoubt in other games. The Yellow Fort will also be a separate model.

4. I wanted to be able to expand this in the future, possibly boards BEHIND the wall for urban based scenarios.

5. So, yeah - I'm building a new 4x8' table, the walls of Limerick, probably a few city buildings, siege trenches, and oh, and I need to paint around 120 infantry to bring my units up to strength at this scale... by the end of August.

Of course, no plan survives contact with the enemy and I'll get into the actual construction in the next post...

November 9, 2015

Quindia Studios Guide to Modular Terrain Boards, Part Twelve

Whew! This is it! There are several different ways we could finish off the river. It doesn't look bad now, but after all of the work we've done so far, why skimp on one of the most important features of these boards. You could just paint the river with a high gloss varnish. If I go that route, I like an acrylic based varnish that is made by Minwax. This varnish cleans up with water so you don't have to mess around with turpentine or mineral spirits to clean your brushes! The more coats you paint on, the better the effect.

 However, an even better effect and my first choice can be obtained by using a pour-on resin. I use Envirotex Lite, but there are other brands of this type of material. This is like building up fifty coats of varnish in one shot (it says so on the box). It dries crystal clear (but we can muck that up - details later) and the finish is as solid as a tabletop. It is very important to follow the mixing directions on the box to avoid a finish that cures poorly or remains tacky!


Since we are going to be pouring stuff into our riverbed, we have to cap the ends to keep the stuff from rolling out onto the floor! Back out comes the hot glue gun! I carefully place a continuous bead of hot glue on the edge of the board around the riverbed and stick a piece of plasticard to it, being careful to ensure a tight fit. The glue will act as a seal and prevent the "varnish" from leaking through. Putting a little Vaseline on the plasticard will ensure the resin doesn’t stick to it. Just to be safe, I also folded a strip of tinfoil around and the under the section as well and secured it with tape. You do not want this stuff to get out! After the Envirotex is dry, you can easily peel the plasticard away and remove any remaining glue if necessary.


You want to pour the Envirotex on a level surface. Check both ends of the board and use magazines or something similar to make the boards as level as possible or you will wind up with one end deeper than the other (which won't really be a problem unless the difference is dramatic - just get it as close as possible).


Ok, after carefully following the directions for mixing the two-part resin, we are ready to pour it on. Start by pouring it down the middle of the river. This stuff is like thick maple syrup and will slowly flow to level itself across the riverbed. Be careful not to pour the stuff over your reeds!


At this point, you can't hurt this stuff by mucking with it so you can use an old brush to spread it across any small gaps that might remain. Sometimes a tiny ridge occurs along the shoreline and I try to break that up by pulling it very slightly up the bank with a brush. You can see the amazing reflections you will get with Envirotex below! If you are satisfied with the results you can stop here!


Obviously, I am never satisfied. My river was still a little too bright to suit me so I set out to pour another coat after letting the first one cure for 48 hours. This time, I added a drop of blue ink to the mix. You could also use brown or green depending on the effect you are trying to achieve, you initial river color, etc. One drop is all it needs because it goes a long way! I just poured another layer on top of the first and the effect was to create a much deeper appearance. If you want to ad color to your Envirotex, I recommend always pouring a clear layer first. I don't know the physics as to why it looks better - something about the way light refracts, but I have found that a clear coat followed by a tinted coat looks better than just one or the other.


The only thing I regret is that I didn't get to texture the river surface. You need to wait six to eight hours after pouring the resin into the banks and then drag a spatula or brush handle back and forth through your river about a zillion times! It will look as though you are positively ruining your lovely work, but the resin will settle back and round your defacing to create great ripples and eddies. If you do it too soon, you will see all of them disappear! I was unexpectedly called out and gone during the period when this should have been done.


I hope these articles have been helpful and if anyone has any questions feel free to drop me a note.

November 5, 2015

Quindia Studios Guide to Modular Terrain Boards, Part Eleven

Time to paint the river! No point in buying quart tins of house paint for this step. I used artists acrylics. Water has no color of it's own. It merely reflects the colors around it. The tendency of most folks is to paint model rivers blue, but the blue is merely a reflection of the sky and blue water is usually only seen in large bodies of water. Rivers and streams usually appear green, brown, or grey depending on what's around them. I picked green. The actually colors I choose were Liquitex Acrylics: Bronze Yellow, Sap Green, Turquoise Deep, Prussian Blue, and Mars Black (not pictured as at first I thought the Prussian Blue would be dark enough).


The technique employed for painting the river is different than that employed for the banks. I want to blend everything as I go so the thing is to work on short sections at a time. I start on the outside with my brightest color. The flash has reacted strangely with the wet paint and everything appears more "day glow" than it is. The bronze color is actually more of a brown green and mimics the shore fading under the water quite nicely.

I basically blend the colors from light near the banks to dark in the middle. If you aren't familiar with blending paint, practice on a scrap piece of card board until you get the hang of it. It's actually easier than drybrushing. You just have to work quickly.


The color above was not deep enough to suit me, so I started blending pure black into the center. All of the photos below show the results.


The river is almost finished. What will bring it to life is the varnish, but before we do that, I want to add a little more detail to the river. Nothing says "water feature" like reeds. For this I am going to use an old wisk broom, a pair of scissors, and my trusty hot glue gun.


Grab a small group of bristles and trim off a section. The exact length doesn't matter because we're going to trim them shortly.


Apply a small blob of glue where you want to position the plant...


Press the bristles into the glue and count "one-one thousand, two-one thousand, three-one thousand..."
 

Then gently fan the bristles out gor a more natural look.


After about five minutes, these things will be stuck forever! You can trim them with scissors to the desired length (and yes, you need to risk the vacuum one more time). Again, you might want to try this on a scrap of card before doing it on your boards until you feel comfortable with the technique.


I just added a dozen or so per board, but you could really go to town and cover the banks. As this is wargames terrain, I really just wanted to give an impression of water plants... after all the goal is to play games on these things. The next article is the last one for these boards and will really bring the river to life.

October 28, 2015

Quindia Studios Guide to Modular Terrain Boards, Part Ten

This step is about adding some detail back to the landscape. All of the drybrushing blended in the rubble and rocks we went to all of the trouble of adding earlier, so they need to be picked back out in dark grey. I used two highlight stages to bring out the detail again. Again I have three quarts of acrylic house paint that I matched to GW colors. The shades are Shadow Grey (No longer available), Codex Grey, and Fortress Grey. Basically, you just need a dark, medium, and light. For that matter, your rocks could be shades of brown or the left the color of the rest of the bare earth. I used grey for the same reason I worked some other tones into my grass areas; I think the color variation really adds to the interest of the boards.

These steps should all be self explanatory after the last couple of posts so I'll just let you look at the pictures without interrupting all the time...


Before painting the river, I want to add a little more detail to the grass areas. This is completely unnecessary, but after all of this, why shy away from a little more work? I want to add patches of static grass in areas not only to add yet more colors, but more textures. Besides, all of my models are based with static grass and adding it to the board will make them look more at home!

It's pretty much like adding rubble. I spread a little glue in the areas I want the grass, sprinkle it on, let it dry, and remove the excess with that risky (don't let your significant other see you using it) vacuum.


Next time we will go back to work on the river. We are almost done!