May 30, 2010

Terrain for Historicon - Part Eight

After letting the first color dry overnight, I moved on to the Dark Flesh tone. I applied this heavily, not quite drybrushing. Some of the darker color still shows, but it is fine to cover it completely in areas. I again blend the color out into the grass, extending the color slightly beyond the darker tone. It still looks clunky at this stage, but as we go on, the layers will really start to blend in with the grass. You need to make sure each color is dry before adding the next one. Since I was working on six boards at one time, the color was usually dry on the first one when I got finished with the sixth and I was able to roll - all of this was done in a single afternoon and I even wasted time setting up the camera!
 
A lot of the blending is done by "stippling" or dabbing the color onto the grass areas. Start with a fairly dry brush and go over sections multiple times to build it up until it looks right to you. Writing about painting is like dancing about carpentry, but hopefully the photos help to illustrate the point.


On to step three... Bestial Brown (love these color names)! Now we are getting more into drybrushing. You will begin to see the textured paint pay off and as you drybrush and stipple the color onto the edge where the earth and grass meet, the areas will start to blend more.


For the fourth stage and I used Bubonic Brown. I actually lightly drybrushed almost the entire board including  the grass with this color too to add some variation in the grass tone and help blend the different areas together even more.


One more color and we are finished! Well, sort of. The last coat isBleached Bone and is applied as lightly as possible, concentrating on the highest elevations, the center of the roads, etc. Once again, I drawthe brush out across the grass areas as well. It's not necessary to hit every spot with this as we want some variation.


Ok, these things are starting to look pretty cool. We could actually stop here and more onto the river, but I want to add some more color into the boards so we're going to paint in some gray rocks in the next post, which will be up in a few days! I will also be adding static grass in areas to add yet another color and texture.

May 28, 2010

My 'To Do' List

Historicon 2010 is fast approaching! With about a month and a half left, here's what I still need to do...

* Finish the game boards! These are coming along quite well, and I should have them done in a few weeks so no real worries there!
* Finish half a battalion of French line infantry... again the work of only a few days if I can find the time to sit down and do it.
* Paint up as many French skirmishers as I have time to finish... ideally I will have 20 in my personal collection (enough to deploy five battalion voltiguer companies), but it may be rare in the game that all of the brigades are acting under the same orders so I might only need half that many for practical use.
* Rebase one battalion of British Light Infantry.
* Paint all of my Brigade Order Markers. I have one set done with three more sets to go.
* Paint the small Spanish village I built for the scenario. This is really just for decoration as it will end up in the corner of the board, but I want as much detail as possible for the convention. I'll have pics of these soon...
* Paint half a dozen Spanish civilians to add a little character to the village.
* Build the bridge around which the Republic to Empire scenario is designed.
* Finish the bases of my European buildings for our Beneath the Lily Banners game.
* Repaint/rebase half a dozen walls to match my current terrain.
* Get boxes to transport 30-40 units of models for the two scenarios (I have what I need to transport the terrain and other tools)!
* Get a king-sized sheet (or whatever I need to cover a 6x10' table) to cover the game tables to dress up our presentation a bit.
* Fashion signs for both games, which will be attached to the sheet via magnets so everyone knows who the heck we are.
* Work up play sheets for the second edition of Beneath the Lily Banners which will not yet be available by Historicon, but the manuscript is ready and we will run those games with the new version of the rules.

I'd love to add a couple of squadrons of Perry Dragoons, but I'm not sure I have that kind of time left. If cavalry makes an appearance the French will need to make due with the 5th Hussars (from my logo above) and the allies with the 1st KGL...

May 25, 2010

Terrain for Historicon - Part Seven

Here's the first of several posts on painting the boards. Not only are we going to paint the roads and river, but we are going to add some paint in areas of the grass to keep it from looking too much like a golf course!

The paints I used came from doing smaller projects with Games Workshops' jars. Rather than buying a dozen jars for each color, I painted small swatches on paper and took (another) trip to my local DIY store to get a quart of each color. The brand doesn't matter as long as you get matt acrylics. The colors I used are:


Next we are going to apply textured paint to all of the non-grass areas to form a base for the remaining painting we have to do. You can buy textured paint in lots of different styles. I bought an empty paint can from my local DIY superstore so I could mix this paint myself. There isn't an easy way to describe what the ratio should be. I poured  my 'Scorched Brown' paint into the can until it was about half full. Start by adding a small amount of sand to your paint and then stir it with a paint paddle. Pull the paddle out and while holding it above the can (pointing down so the run off goes back into the can), use a brush to thin out the remaining paint on the paddle. If the texture on the paddle looks good to you, you're finished! If not add a little more sand, stir it in, and repeat the process. If the paint becomes gummy, you went too far. Don't panic! Just add more paint - that's why we started with half a can...

You want to use an old brush to apply this stuff because it's tough on the bristles! The goal os to completely cover all of the filler, coffee grounds, tree bark, and whatever else you glued into your landscape. Vary the direction of your brushstrokes - you will be able to see the patterns of the strokes because of the sand, but if you pull from different directions, you will get a good smooth coat.


Then I painted all of the exposed areas expect the river. I also drybrushed and stippled some small areas of the grass and blended out the road and river banks for a smoother transition between earth and grass.


This looks crude so far, but as we build up the next four layers, it will begin to blend smoothly into the landscape. Here's a pic from an earlier project to show what things will look like in a few more days (we'll be painting the rocks after the earth areas are finished)...


May 19, 2010

Terrain for Historicon - Part Six

The next step is adding another layer of texture to the boards. The first thing I add are chips of brick that I picked up from discards at a nearby construction site. The main areas I want the stones are along the river banks and the slopes of the hills, but I'll place a few near roads to tie all of the boards together visually. The pics in this post are of a road - it is sunken where it meets the hillside and though is darn near impossible to see in these pics, it gradually rises to the level of the ridge. The cluster of stones at the top and bottom of the first photo mark out the point where the road enters the slope. I attached these using a hot glue gun, but other glues will work fine. I picked the hot glue gun because it dries instantly.


Now we need to add smaller rubble. I scatter patches of rubble, paying particular attention to the edge of roadways and rivers and around the "boulders" I placed earlier. I also cover up parts of the putty where the knife strokes seem too obvious. You can add patches in open ground as well (see the photos below) but remember that you also want to leave room to place loose terrain pieces. Your models will look fine teetering on a pile of rock, but although your cottage model will be in no danger of falling over, it won't look as good if one corner of it's base is off the ground.
 
The material I use for this size texture is coarse ground coffee. I started using this years ago when someone at work was about to throw out a huge tin of Maxwell House that co-workers thought was too strong. I rescued it, thinking to use the tin for the basis to build a tower. I was about to embark on my first set of terrain boards at the time and realized the texture of the ground coffee would be perfect for mid-sized rubble! That was ten years ago... and I still have some of it left. I have since found that choosing a flavor of coffee that matches the period you intend to game in adds another level of realism to your boards...

Ok, I made that last part up, but you were already thinking about what kind of coffee would go with your Belgian countryside terrain weren't you...

Anyway, I put down a small patch of glue, smear it around with a damp brush, and sprinkle on the coffee grounds.


At this point, the rubble areas will look heavier than they will end up. After letting the glue dry overnight, I vacuum the boards to remove any stray grounds before moving on to the next step. Remember the advice I gave you about the iron a few posts back? This goes doublely for the vacuum. Best not to even risk this when your significant other is home...

May 17, 2010

Historicon Schedule

The event list for Historicon 2010 has been up for a couple of days. Barry and I will be running six games over the course of the convention, three for each of our books:

The Battle of Almaraz - Spain, 6 Aug 1809
Thursday 4PM, Friday 8 PM, and Saturday 9AM (each game is scheduled for 3 hours and 8 players)
GM: Clarence Harrison with Barry Hilton
Sponsor: League of Augsburg and Quindia Studios
Napoleonic 28mm, Rules: Republic to Empire
After the battle of Talavera, the British were victorious but forced to retreat all the same as French reinforcements arrived. The British formed a new defensive position behind the river Tagus. All of the crossings were well defended, but that might not have been the case if Marshal Soult had been more decisive....

The Battle of the Boyne - Ireland, 1 July 1690 - Theme Game
Friday 10 AM, Saturday 2PM, and Sunday 9AM (each game scheduled for 3 hours and 8 players).
GM: Clarence Harrison with Barry Hilton
Sponsor: League of Augsburg and Quindia Studios
Pike and Shot 28mm, Rules: Beneath the Lily Banners
Two armies consisting of Danish, French, Dutch, Huguenot, German, English and even Irish troops met on the banks of the River Boyne near Drogheda. Both were led by men insisting that they alone were the rightful King of England…

I find it funny they've been listed as "GM: Clarence Harrison with Barry Hilton". More like "GM: Clarence Harrison watching Barry Hilton." Well, at least with Beneath the Lily Banners. I filled out the registration so I guess I got top billing. Anyway, you can grab spots in one (or more) of these games if you preregister. In the event that all the games fill up (and I honestly have no idea what kind of interest they will generate), you're welcome to come by anyway - if it's at all possible, we'll find something for you to command as long as there's room at the table!

May 13, 2010

The Game Room

Lawrence Ofarabia asked a question about my game table (the one I pile all of my terrain boards on) in the last post and after answering briefly, I thought, "Wow, that sounds like a blog post waiting to be written!" and here it is. I am lucky enough to have a wife that thinks it is important that I have my own space. In fact, I have two rooms in my house that are dedicated to my hobby (and several bookcases in the hall that connects them)! One is my 'office'. It's where the desktop PC resides alongside my painting desk, collection of Napoleonic books and historical novels, and my Ampeg PortaBass 228 practice amp and Yamaha Attitude bass guitar... the makings of another whole blog post!

This post is about the second space, known as 'the game room'. The main piece of furniture in the room is a vintage sewing table that my wife has owned for more than thirty years. The table is 4x6' and topped with a single piece of polished slate slab framed in wood. Underneath are four cabinets filled with unpainted miniatures, terrain projects, books, and heaven knows what else (every time I attempt to clean them out I stumble on some half started project that I'd forgotten about). Besides serving as my main gaming table, it's great for large terrain projects (like painting terrain boards)... and yes, my wife still uses occasionally for cutting fabric for which it was originally designed.


Besides, the table, I have two miniature display cases, three book cases crammed full with rule books, Osprey guides, White Dwarf magazines, and my ruined city models for Warhammer 40k, a closet full of 2x4' terrain boards, and enough room for a small Windsor chair! On the walls I have Frazetta prints, a map of Middle Earth, a map of my own fantasy world (The Realm of Quindia), and an antique mirror that may be from the late 1800's according to my wife's family. Ceiling fan, a view of the back yard, and a little hut by the window for my cats, Napoleon and Josephine... aside from the fact that I wish it were twice the size, I don't think I could ask for anything more!


Less frivolity and more terrain coming up in a few days!

May 9, 2010

Terrain for Historicon - Part Five

The adventure continues. This article will show how I start down the road to add... err... roads! The boards in my existing collection are designed to fit together which each other in as many combinations as possible and I want these boards to fit in as well. All of my roads will be two inches wide which will allow most of my collections to fit in march columns. The roads may vary on the board, but they must be consistent at the edge to minimize noticing the join between boards. All of the roads must also enter from a consistent spot, in this case, eighteen inches from a corner.

Using a ruler to mark the entry points and my trusty diagram for the general layout, I use my trusty Sharpie to mark the roads on the boards.


Back to the sharp knives! After drawing the roads, I trade in the pen for a knife and carefully cut just to the outside of my marker lines.


You want to be sure you cut all the way through the mat. Don't worry if you cut into the foam. We're going to be adding texture to these roads that will hide any small cuts. Press down on the part of the grass mat that's supposed to stay on the board and carefully peel away a corner of the section to be removed. You will find if you were careful about cutting through the mat, you can lift off a section despite the glue.

The next step is to blend the roads and riverbanks back into the landscape and get rid of the precision line where they meet the grass areas. Not only will this step give your roads a nice base for adding texture, it will also seal the edges of the grass mats and hide any gaps between the wood battens and foam at the exposed edges of the roads and rivers. I use a wallboard joint compound, but there are lots of readymix filler compounds that work well. You want to find one that claims not to shrink when it dries.


The trick of applying this for our purposes is to place a... ummm... lump? Pile? Clunk? Anyway, put the stuff in the center of the road and use the putty knife to drag the filler across the roadway and up onto the grass mat. Work from the center out toward the grass, first one one side and then the other. If you feel like you pulled too much filler onto the grass, don't sweat it - you can cover this up in later stages with any of a variety of textures, including adding grass flocking back onto the board to narrow the road!


Then pull the knife gently along the direction of the road. If you like, you could drag a paint brush handle through the filler to simulate ruts in the roads. I want to be able to use my boards for different scales and the ruts would lend a definite sense of scale to the terrain so I opted not to do this.

Once the roads are done, you can break out a larger putty knife and work on the river banks. I use the same technique, basically putting down some filler along the bank and then blending it out toward the grass. There is no need to try and completely cover the foam since we're going to be adding yet more texture and paint. Just blend the filler as smooth as possible. You will always be able to hide any unsightly spots during the next step where we add rubble or you can sand out any rough spots if you prefer.. Avoid getting any of the filler on the river unless you want to model rapids!


Follow the directions on what ever filler you use as far as drying time is concerned, but remember that we've applied it thicker than it is designed to be used and it may take additional time to dry. The next step is adding additional texture. These things will really start to look cool after that!

May 3, 2010

Terrain for Historicon - Part Four

We are going to start to make these things look more like terrain this time. There are lots of ways to add texture to your game boards, but the way that I have found to be the best and quickest (quick is big with me), is to glue a grass mat to the board. There are lots of different styles and you could use any one you choose, but you want one with a cloth or felt backing rather than a paper one, for reasons that will become obvious as we go through this article. The brand I use is from Monday Knight Productions and I get mine online from the Warstore in the USA.
 
You need to cut the mat into sections slightly larger than your boards. For the river sections, the cuts don't have to be perfect along the banks. Just make sure they come near the edge of the foam. We're going to trim to perfection later...


Ok, guys. This is an iron. Get your wife or girlfriend to show you how to use this, but be careful that you don't display too much proficiency this this thing or you might find yourself with new chores. If you are really smooth, you can get your wife to iron the mats for you... like I did. You can see above that the mat has lots of creases from it's packaging. If you manage to find a grass mat that comes rolled on a tube (lucky you) you can skip this step. Just choose a low setting and only iron the felt side. We're not going to get all of the creases out this way, but the main thing is to make them less noticeable.


Ok, the reason for the glue is obvious. White glue will work just as well, but I used the carpenter's glue because that's what I had on hand. A bucket with a little water. an old brush, and a spray bottle filled with water are the only other things we need to continue.


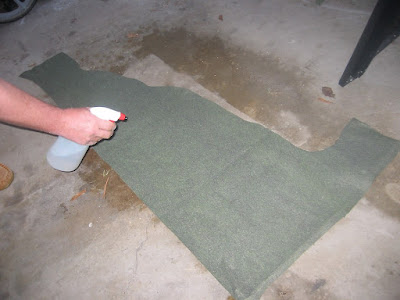
You're going to want to do this next step outside or in your garage. I suppose you could use your tub, but a new grass mat flakes quite a bit and you're going to end up with a mess! What I'm doing here is spraying the back of the mat (the felt side - same one we ironed) with water. We just want the material damp, not dripping. There are several reasons for this. In the first place, it will add weight to the material and help keep it tight against the board/foam. This is important since you can't set books or things on top of your terrain if you have hills or river beds. The water also makes the material stretch a little and it forms well to the prevoiusly mentioned hills, etc. Finally, it helps reduce the wrinkles we couldn't get out with the iron!


After wetting the mat, turn to your board. The mat won't dry out too quickly so you have time as long as you only work on one baord at a time. I start on the outside and place a thin bead of glue along the wood frame. It is important that the mat forms a solid bond around the edges. Then I basically lay out more glue in a spiral pattern and take a wet brush and smooth the glue as evenly as possible on the board.

On the river boards I don't try to put the glue all the way down the banks to the wood, because I'm going to trim the grass back as I mentioned before. Just leave an inch or two of foam glueless.


Place the damp mat onto the sticky foam and press it down. You should be able to smooth out any remaining wrinkles. If you build in slopes and hills on the board, you can use straight pins to help hold the mat tight against the foam while the glue dries.You can remove them later, or simply cover them with texture in a later step.

 
Fast forward... this is important... I let the board dry for three or four hours before moving to this next step. With a sharpe blade (I used a new blade for each board) trim away the extra mat. This is easier than it looks if you use the edge of the wood to guide your knife. Make sure to take you time to get neat edges and avoid losing a finger!
 

It took a week for me to get the grass glued down on all six boards, but I was able to only get in a few hours a night. You need to be patient during this stage to ensure a strong, permanent bond of your grass mat. 

The next installment will focus on adding roads, trimming up the river banks, and adding the next layer of texture. I'll try to get a shot of all six boards laid out on my garage floor (I don't have a table large enough to set up a 6x8' table at this time).
May 2, 2010

Spanish Artillery

Well, sort of... like my Spanish infantry battalions, these worthies are barely converted revolutionary French models. While the infantry are plastic Victrix, these models are from Eureka. I cannot recommend these models enough! They are well proportioned, finely detailed, and a joy to paint. These models have me studying the early war period for a conflict I can base a small collection on!


My scenario for Historicon will see these Iberian heroes holding a small hermitage on a hill, supporting two Spanish infantry battalions, trying to stop the French from crossing the Tagus river. The Light Brigade is marching to the sound of guns, but the Spanish will need to slow down the enemy advance to give the allies a chance!

Information on Spanish uniforms is always iffy at best around 1810 so I settled on the 'official' uniform from a few years earlier for the color scheme. For the gun, my research said the colors were light blue, gray, 'stained' wood, and dark gray so I settled on a nice blue-gray and added a little weathering (now it's kind of all four colors).

The game boards are progressing slowly, but I should have a new installment coming up in a few days...