

The concept work began last spring on my home from Scotland. I got my first GNW models from the bins at Hilton HQ (it was like Christmas). I'd been wanting to paint some of these cracking sculpts for a while, but committing to marshalled ranks of troops was not in the cards, at least until I get some more units for my Ireland campaign done. Donnybrook was the perfect vehicle to get into the period.
We spent a lot of time talking about the Donnybrook Dark concept during my visit and I decided to use my new Swedes and Russians as the basis for black powder fantasy armies. As I said, I KNEW I had to have zombies and spent some time sketching out what these should look like.


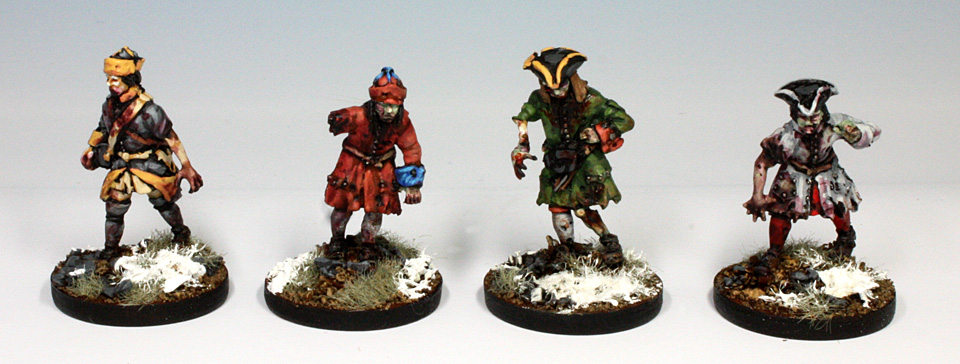
I did take a few work in progress shots, but sadly most of them weren't very helpful. The photo above shows my first four completed models.
Turning these lovely Warfare Miniatures into staggering zombies is really pretty simple.
Think of the Pose
Zombies are lurching, lumbering monsters (at least the Romero type which are the only TRUE zombies). The noble bearing of most soldier models doesn't usually give that vibe. The easiest way to accomplish this is to remove one leg where it meets the coat, file away a small amount of metal at an angle, and glue it back in awkward position. It doesn't take much - trimming the leg away remove a mm or so of material already. The goal is to end up with a slight lean - too much and your mini is going to fall on it's face! If you are careful, you don't even need to remove the foot from the base. Several of the models above had their legs replaced entirely (see below), but it's necessary to get the effect.
Another thing you can do is get rid of that proud chin in the air by taking your clippers to the poor fellow's throat. You don't want to cut all the way through (though it's not the end of the world if you do). Again, the clippers remove a small bit of material and you can now bend the head down so in lolls on the chest or toward the shoulder. Just add a tiny dot of glue before doing so. If you behead the poor chap, you can still just glue it back on. Also choose a model with short hair, because this won't work well with long haired people like me - you'll need to break out the putty and sculpt the hair back to make it look right.
There are even a few models that look like they are stumbling around already when taken out of context of their tools - check out the Artillery Crew Running Back Guns...
Zombies are Hard on Clothes...
This part is easy. Grab your trusty clippers and chip up the bottom hem of the coat, edges of cuffs, and tricorn brims. Then use a pin vise to drill small holes in the coat and stockings. I cluster these around the torn hems first and then scatter some around the rest of the model. You can add larger slashes which look good on arms or shins with a scalpel.
...and Even Harder on Limbs
I used a sprue of plastic zombies from Warlord Games to quickly add dessicated limbs and the like. There are several manufacturers you could choose from, but Warlord fits in well with Warfare. Replacing an arm only requires a straight cut at the shoulder and possibly a bit of greenstuff. A hand is even easier and replacing well manicured digits with gnarled claws is great bit of detail. You can even remove an arm entirely for the easiest conversion of all. A few of the Warlord models have bare legs and feet and these were great for adding more variety. You can also use clippers to remove the lower jaw or of a model with an open mouth, a pin vise to remove an eye, or scalpel to add cuts to a cheek!

Zombies Don't Take Baths
The absolute easiest way to make models look like zombies is paint them to look like zombies! Paint the skin a bloodless bone or mottled grey and give them clouded white eyes if you paint such things (I skipped them on mine because I tend to leave eyes as shadow for historical models, but I think I'll go back and paint them for an extra bit of sinister). When you paint the clothes, take extra care to highlight the rips and holes you put all that hard work into making.
Add mud and mire. I just drybrush my base color on the lower third of the mini and add a swipe here and there farther up.
And, yes, add some gore. There are lots of ways to do this, but I used Games Workshop washes. The first is Carroburg Crimson and I stipple this around the mouth and down the front of the coat, on the hands to varying degrees, around obvious wounds I've created, and then splash some add random spots to break up anything that still looks clean. The next color is Agrax Earthshade and I apply this in the same places as the crimson, but concentrate it toward the center to represent darker areas of dried blood. Finally, I use a very small amount of black paint to deepen the gore around the chin and the tips of the fingers.

So, that's it and now all of you can mutilate Clib's wonderful models (or minis from any manufacturer really because this works for any period)! I really want to build a horde now of shambling undead. I have plans to make bareheaded zombies using some of the bits from the Warlord sprue, civilians, cossacks, and maybe some of those ready made pirates I mentioned earlier. Someone was on about zombie horses and I actually HAVE some so I might even mix in a few cavalrymen.
Hope that helps! Now that my credibility as a historical gamer is destroyed (ok, I didn't have that much to begin with if you wander my other blogs with Space Marines), I'll let Barry show you some of the stuff he's been piling up in the closet...
Yes! That is a great idea, with excellent execution. You got me thinking of how to add more zombies to my horde now. ;)
ReplyDeleteBrilliant conversions!
ReplyDeleteBrilliant execution
ReplyDeleteAwesome miniatures!
ReplyDeleteThanks, Guys!
ReplyDelete