Showing posts with label Terrain. Show all posts

August 15, 2018

Guns of August 2018

Progress...


The static grass I use comes in sheets, so once the glue is good and dry, I can feather the edges and blend it in to make look a little more natural. That's it... I'll post another pic of the finished table with all of the rest of terrain in place this weekend...

August 6, 2018

Guns of August 2018

It's been quiet around here, but I've not been idle - just haven't had the time to do any proper posts. My games are officially scheduled for the Guns of August show at the Virginia War Museum in Newport News, VA. On Saturday (August 25th) I'll be running games of Beneath the Lily Banners at 10am and 2pm and again on Sunday (August 26th) at 10am. My table is in the main hall, across from the M-5 tank! I'll also have copies of the new BLB book, The War of Three Kings, as well as Donnybrook and Republic to Empire for sale at the table.

Speaking of the table, remember how I said I already had the boards I needed to run the scenario I've chosen - Crossing the Shannon? Well, somehow I decided they wouldn't work, so I'm building a brand new 4x8' table...


I'm trying something new, using 2-inch thick foam tiles, rather than my usual wooden boards. These are what Barry Hilton has used for the League of Augsburg games for decades. I'm using a mix of 2x2' and 2x4' sections. They won't be as tough as my old method, but my brother suggested painting the sides with a few coats of white glue before painting them which will give much more durability. They also won't be anywhere near as heavy as my old boards as I can easily carry the whole stack in one trip.

Barry's boards are painted and flocked, but I used my normal method of a felt-backed grass mat for the main layer. I just glued the mat to the foam and trimmed the edges flush when it was dry. With the method, you never need worry about the grass falling off and leaving bare patches!

This is a very fast way to make a table. I glued all of the felt in one evening. The river and roads were carved in another and covered in joint compound. The rough texture (my usual coffee grounds) was added this morning and the glue will be dry to allow the first coat of earth paint to cover all of the white areas this evening. Not bad for three days work. This week I'll finish the painting, including the river and add additional static grass and other ground cover. The last step will be adding resin into the river bed, probably next weekend.

I love building terrain and I think I really like this combination of materials. There has been zero warping of the foam so far. I'll reserve final judgement until after I see how these stand up to a weekend of gaming.

More later...

April 30, 2018

The Walls of Limerick, Part III


I've made some progress on my project for the Guns of August show this summer. It is August 24th-26th and I am definitely attending, though I will only be there Saturday and Sunday. The plan is to run the game twice on Saturday and once on Sunday. I have more detail to do on the walls of Limerick, but some of that will be easier do once the models are attached to the tiles. Before doing that I wanted to build the glacis and covered way that had been constructed outside the walls. The photos aren't great because the expanse of white foam fought all efforts to get decent contrast and the results are a bit over exposed, but you can get the idea.


The gabions are plastic kits of Renedra Limited. These come in halves which worked out perfect to model the fort because I wanted them half buried in the front wall.


The glacis will be a longer slope when I break out the filler to blend all of these features into the board. Multiple layers of texture and scattered debris like buckets, spare timber, and fascines will all be added at some point. However, my next step is to turn my attention back to the walls, fixing them permanently to the tiles and adding another layer of detail to them.

Luckily, these two tiles will represent the bulk of complex modeling. I need to make six more tiles, two with smaller trenches and one with a river shore, but they should be quick work after these. The remaining tiles are pretty much flat and open. I also need to build a small redoubt for a gun that stands just outside the gate and a larger one for the Yellow Fort.


I've also started the expansion of the units I'll need to put on the game at 1:15 or 1:10 give or take... this means standard infantry units of five stands rather than three, though my Danish Guard will weigh in at SEVEN stands! Luckily, due to the fact that a standard two-stand squadron in BLB actually represents two squadrons at the normal scale, I have all of the horse I need to cover the squadrons I'll use for this game.


Twelve more models to go for this battalion... more soon!

April 16, 2018

The Walls of Limerick, Part II

A little bit of math, lots of carving, and possibly some harsh words later...

The initial step, and the most important to get right, was to layout the front wall. This is where most of the harsh words came in. All of the angles had to meet up with each other and line up with the edges of the boards.


The walls were detailed by carving scattered stones with a scalple and then going over all of the cuts with a ball point pen. The pen makes a nice bevel on the edges of the stones and ensures the detail won't be filled in by the layers of paint coming up. Cutting the stones in initially with a blade means you can use a piece of balsa wood to press some of the stones into the surface which adds a cool bit of detail with very little extra effort. I'm going to add a few stones cut from slivers of foam that will stand out from the wall as well, adding yet another layer.


The windows were pressed down in the same manner as I just described. When painted it will add to the illusion of depth.


Very pleased how well all of the parts actually fit together...


So here's where I am after the weekend. The angled wall with the walkway will be attached to one board and the citadel and it's adjoining wall be attached to the other. The central wall with the gate will remain loose so it can be replaced with a section of rubble. No, this wasn't deja vu - I explained this in the first post, but I thought it made more sense now that there are photos!


Next up are the details.. gates, doors, trapdoors, stairs... stay tuned!

Oh! And thanks to everyone who reached out to send me photos from Limerick - your contributions are much appreciated!

April 13, 2018

The Walls of Limerick, Part I

Every so often I get the urge to launch some sort of stupid large project. Ever since my partner's series on the Walls of Derry, I've wanted to do something similar. My trip to Derry last year reinforced the desire. Finally, I'm planning to run some games at a small local show if my schedule works out - The Guns of August in Newport News, Virginia. Rather than just set up something from my existing collection, I decided to build a new table and go all out.

Sorting through the mound of books I've collected on the campaign of Ireland, my first inclination was to do something around Derry again. However, then I stumbled on the first siege of Limerick. Gamers often ignore sieges thinking them to be dull., static affairs of battering walls with cannons, but both Derry and Limerick feature several small actions in the form of sallies that make perfect tabletop games.

On August 20, 1690, the besieging Williamite army launched an assault from their siege trenches to capture Yellow Fort, a small, open-backed redoubt outside St John's Gate. It took several attempts, but they were successful. The Jacobites responded in force with a sally by four battalions of foot and three squadrons of horse, countered in turn by more infantry and cavalry from the Williamites, including one of my favorite unit - the Danish Foot Guard.

To bridge the gap between the small forces involved in the initial assault and the battalions that later took the field, I've also decided to reduce the man to model ratio which will give me foot battalions of five to seven stands rather than the standard three. This will allow me to represent the detachments with a significant number of models rather than the 4-5 each would muster at the default scale.

I'll go into more detail about the scenario and forces involved in a later post, but for now I just want to introduce the project.


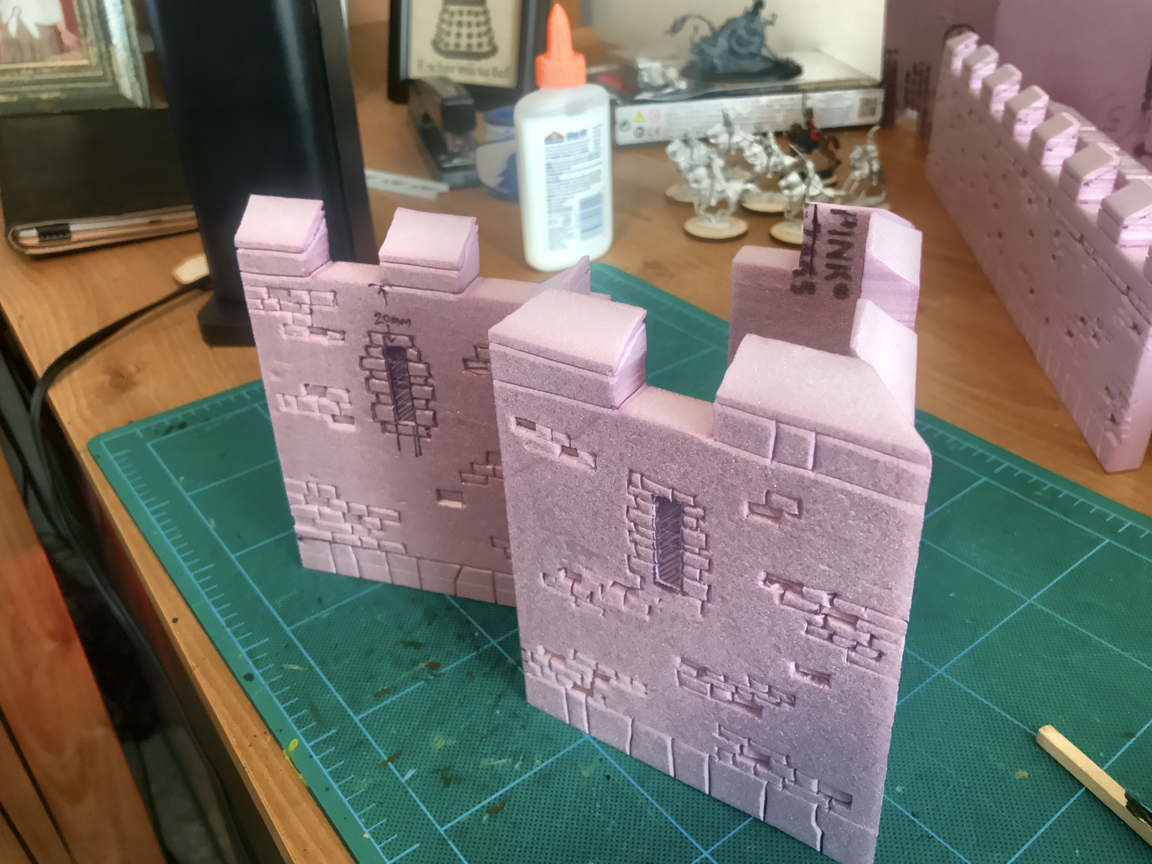
The walls of Limerick were between 25 and 30 feet high with a narrow walkway on the top. A ditch was excavated outside the stone wall and the spoil used to build a counterscarp, covered way, and glacis. The tiny section of wall I'm building is St John's Gate, seen above on the left end of Irish Town. The old citadel near St John's Gate was pulled down and replaced with a new bastion and an earthen demilune constructed outside. My first step for any project like this is sketches which I then take to the computer to make a scale diagram. This was extremely important for this project because there are very few right angles and it was going to be a pain to make sure everything lines up properly.


I spent a lot of time messing around with scales and angles to decide exactly how to lay this out. There were a few things to take into account...

1. I wanted to avoid a 'square' table. By this I mean 95% of games you usually see... side A is lined up on this table edge and Side B is on the other. The historical design actually helps this as the wall runs away from the gate at an angle. The battalions will actually end up facing down each other diagonally across the board.

2. I wanted the fortress to be permanently attached to the boards, but I wanted to keep things flexible so I can use these for other scenarios. What I decided was to use 2x2' boards. The bastion would be attached to one and the wall to the other, with the gate section remaining loose and 'bridging' the boards. This will allow me to replace that piece with a breach to play another style of game. Not sure if that makes sense, but it will be illustrated as the project progresses.

3. I wanted the counterscarp (and the siege trenches - more on that later) modeled as a permanent part of the boards, but decided to build the demiline as a separate model so I can use it as a redoubt in other games. The Yellow Fort will also be a separate model.

4. I wanted to be able to expand this in the future, possibly boards BEHIND the wall for urban based scenarios.

5. So, yeah - I'm building a new 4x8' table, the walls of Limerick, probably a few city buildings, siege trenches, and oh, and I need to paint around 120 infantry to bring my units up to strength at this scale... by the end of August.

Of course, no plan survives contact with the enemy and I'll get into the actual construction in the next post...

September 1, 2016

Dark Age Village

I alluded to the fact a few weeks ago that I was scratch building a Dark Age village. There are lots of nice commercial products available for this period, but when I realized how many I wanted, I decided I'd better try to build some of my own. Besides I enjoy scratch building from time to time and decided to give it a try. These models have actually been finished for a while, but I only got the chance to take pictures last night.


They are made completely from foamcore, balsa wood, and teddy bear fur. I'm afraid I didn't take any WiP photos. I was working without templates and kind of doing everything by eye. I got so caught up in the construction process, I forgot to document any of it (hopefully when I go to add more I can remember what I did)! If you have questions, post them below and I'll try to answer them...

The fences were interesting. My first thought was to make tight waddle fences from wire (like the wattle door on the first building above), but when I turned to Google for inspiration, I found images of some very 'rough' looking fences that seemed to have much more character.


These fences are made from toothpicks and fake bamboo shoots purchased from a craft store. I stumbled on the material by accident while looking for floral wire. The wispy ends had enough flexibility to weave between the posts and I secured them with a bit of liquid superglue. I have six sections, but I easily have enough material from the fake bamboo to make 60...

I am very pleased with the results. I want to build another large house, a main hall, and a church, plus a handful of outbuildings. Besides being great for any Dark Ages era, these would be great for the Medieval period, rural areas of the Renaissance period, and the Rohirrim of Middle Earth!

More Dark Age troops on the way...

March 22, 2016

Tilting at Windmills

Whew! I just completed this fantastic windmill model from Tabletop World.  I think there are less details on a Napoleonic hussar!


Check out the ropes on the back of the vanes, securing the sails to the frame. Of course, this model will be the centerpiece in our Battle of Penny Burn Mill game for Historicon 2016, forming the anchor of the Jacobite defense.

The stonework was drybrushed in multiple layers and then I use several GW washes (Nuln Oil, Reikland Flesh, and Carroburg Crimson) to pick out individual stones to vary the tones. Then I used a final highlight of my palest grey to blend these back into the whole. I spent a very long time blending the smooth fabric of the sails and I'm not sure it shows in the photograph. You'll just have to come along and see it in Fredricksburg!

January 4, 2016

Historicon 2016 - Game Layout

I kicked off the new year by getting the Battle for Penny Burn Mill board underway...


It's not much to look at yet, but I needed to get the basics started so I can work out some of the specifics for the scenario. More over at the League of Augsburg site...

December 29, 2015

Frostgrave Board, Part Four

Right! So this is nearing completion. I wanted to add some variation in the color, while still maintaining the overall grey stone. The effect is actually a little more subtle, but the flash seems to have reacted strangely with the oil paint. I'll some properly lit photos once everything is finished.


I used oil paints and thinner to add a bit of grunge to the board. It's basically the same technique military modelers use to weather vehicles. You apply small random dots of oil paint to your model and then use a brush loaded with thinner to create a wash. Then use paper towels to soak up the excess and any bits that might pool up. The random effects give a very realistic finish. This is super easy. You really can't mess this up. If you think there is too much color, just keeping going over it with thinner. You can even work back into areas several hours later.


Here you see a good before and after. The painting is done (minus painting the edges a neutral grey) and the final step will be adding snow. I'm going to add small drifts in corners and on ledges and add scattered snow flock. I don't want to cover the board so this will be done sparingly and in several layers so I can build up the effect gradually. I am also going to scatter some icicles around the walls as well.

It's getting exciting now!

December 27, 2015

Frostgrave Game Board, Part Three

I managed to make quite a bit a progress over the last few days on this project...

The thing that took the longest was getting the roof sections to fit snuggly - there was a lot of math and a little bit of cursing involved...


I also used balsa wood to trim out most of the balustrades and add a little extra detail on the largest walls. Finally I cut out about a jillion (well, it seemed like that anyway) card rectangles to add the illusion of stone bricks.

Then I covered the entire board in a mid-grey (matched GW Dawnstone in a quart from the hardware store) mixed with a small amount of sand to add texture.


Finally I drybrushed and stippled a light grey (matched to GW Administratium) to bring out the texture and details. I'm only going to do one highlight layer because I want a fairly monchrome appearance to the structure which I think helps create a moody, cold landscape.


I plan on painting the edges of the board the same color as the initial coat, but I wanted them smooth so I skipped them when I did the base coat. The next step is adding a bit of weathering with oils and mineral spirits which I may to get to later today. I'm not going to do as much as I might if this were to be a 'normal' city ruin (see above about the monochromatic effect), but I want to add a little variation.

Finally, I decided to go all in on Frostgrave and add snow and ice, but I'll talk more about that when I get there...

December 20, 2015

Frostgrave Game Board, Part Two

I thought I'd share my progress so far. The initial steps were to painstakingly transfer my designs to the foam core that will make up the walls of the structure. The process saw me break out a freaking compass which is a tool I don't think I've used since the 90's!


The basic structure takes shape...


My cat, Napoleon, has come to help...


These stairs took longer than anything else on the board because of the angles. The scale is a little funny for steps, but I compromised realism for game play - each is broad enough to allow models to be placed without worrying they will tumble down.


So far I've got around 14 hours into this, including the sketches and initial design work. The next step is to add the floors and I'll probably be able to finish that stage tomorrow.