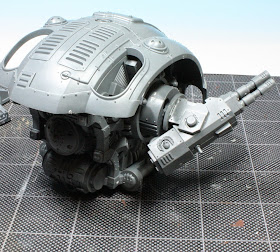
The hardest part to figure out was how to reposition the carapace, but once solved was relatively easy to accomplish. I built the legs and carapace as per the instructions minus the front plate where the head is mounted. Then I cut up the right weapon arm to get this ball joint and glued it to the hips...
I positioned the carapace as far forward as possible, with the open hole in the waste touching the ball joint and marked the spot with a Sharpie. Then I drilled a hole all the way down into the hip at an angle, glued a steel rod down into the hole, and secured the carapace by gluing a length of PVC tube that perfectly fit my wire on the inside. I also added plastic model glue on any parts that touched (ball on the hips to the socket on the torso, etc).
After letting this dry overnight to ensure a solid construction, I added the front plate at an angle to make the head protrude from below the top (now front) armor. You need to have the armor attached to see the position, but I've left it off for the photo so you can see what I did. You can see it actually ends up behind the tabs that would hold it on a standard knight construction. There is an empty gap above the head, but it is impossible to see it without turning the model upside down. For those of you who paint the interiors on your Rhinos, you could certainly fill the space with spare bits, pipes, etc. I didn't bother...
The weapon arms were dead simple. I used the shoulder joints of the knight with the supports removed and glued the cannon assemblies from a Space Marine Stalker tank. I'd like to say these cannons were spare from my bits box, but I bought the kit to get them... Yes, I could have shopped eBay, but I was on a roll and didn't want to wait for mail order! I can always use the extra Rhino anyway...
The missile launcher was made from both missile pods from a Valkyrie kit (yes, these WERE from the bits box). I just glued them together and used one front and back assembly. I THINK the side struts and swivel mount came from the Valkyrie as well, but I'm not positive as they came from my bits box too. I drilled a hole through the missile launcher and used plastic rod to attach the struts. I drilled a hole at the top of the carapace and used another spare bit of plastic tube to help secure it.
So that's it! I need to add the Imperial crest on the carapace and of course I will glue down the leg armor after it's painted. I'm not going to use the shoulder guards to increase the difference in the silhouette of the knight. I wish it was a little shorter, but there was no easy way to shorten the legs.
The base will get the same rubble treatment of my first knight. As I mentioned in the last post, the warden will be mostly white with yellow and black accents to tie it into House Hawkwind. It will probably get the small Red Scorpion emblem on the knee as well. I don't have rules for it yet, but I will probably just use the Stalker cannons as, well... Stalker cannons. I need to glance through my old Adeptus Titanticus stuff to decide for sure.
I'm looking forward to painting this model, but I have another 'normal' knight on the table at the moment so it may be some time before I get to it!


Thanks very much for this Clarence! This will definitely be my number two build for the Knights. Very cool.
ReplyDeleteCheers
Dave
Still a few details to add, like cables for the missile launcher, but I'm happy with out the model turned out. I will keep an eye out for your version and I will be interested to see what kind of rules you come up with...
ReplyDeleteYayy! Wardens!
ReplyDeleteNice work, but what about the "shin" armor from the original? Could you use the shoulder pads there?
ReplyDeleteJust so you know, I bought a Knight AND a Stalker kit today.
ReplyDeleteLOL... My warden jumped the queue... I was working on a second knight, but I set him aside to paint the warden. I just undercoated the model this morning. I sprayed the skeleton black and the armor plates white. I think it will be easier to paint the trim and use controlled washes rather than paint large smooth white areas!
DeleteMan this is excellent conversion work. Consider me inspired!
ReplyDeleteMe too! This is bound to be looted again ;)
ReplyDelete